Have you ever noticed how some websites grab your attention just as you’re about to leave? That’s the magic of exit-intent popups – a powerful tool to turn visitors into valuable customers. The best part? You don’t need to be a tech wizard to set them up in WordPress.
Here are the easy steps to create an exit-intent popup easily:
☑️ Install and activate a popup builder plugin
☑️ Create a popup with essential elements
☑️ Design the popup with a visually appealing layout
☑️ Apply the exit-intent trigger to the popup
☑️ Set the ideal target audience for the popup
☑️ Set up the target pages for the popup
Using this approach, you can easily create and display an engaging exit-intent popup.
If you want a detailed guideline on creating an exit-intent popup, I have created a helpful video for you:
If you like to read, I will also discuss details about each of these steps in the next sections so that you can implement it on your site without an issue.
What is an Exit-Intent Popup in WordPress?
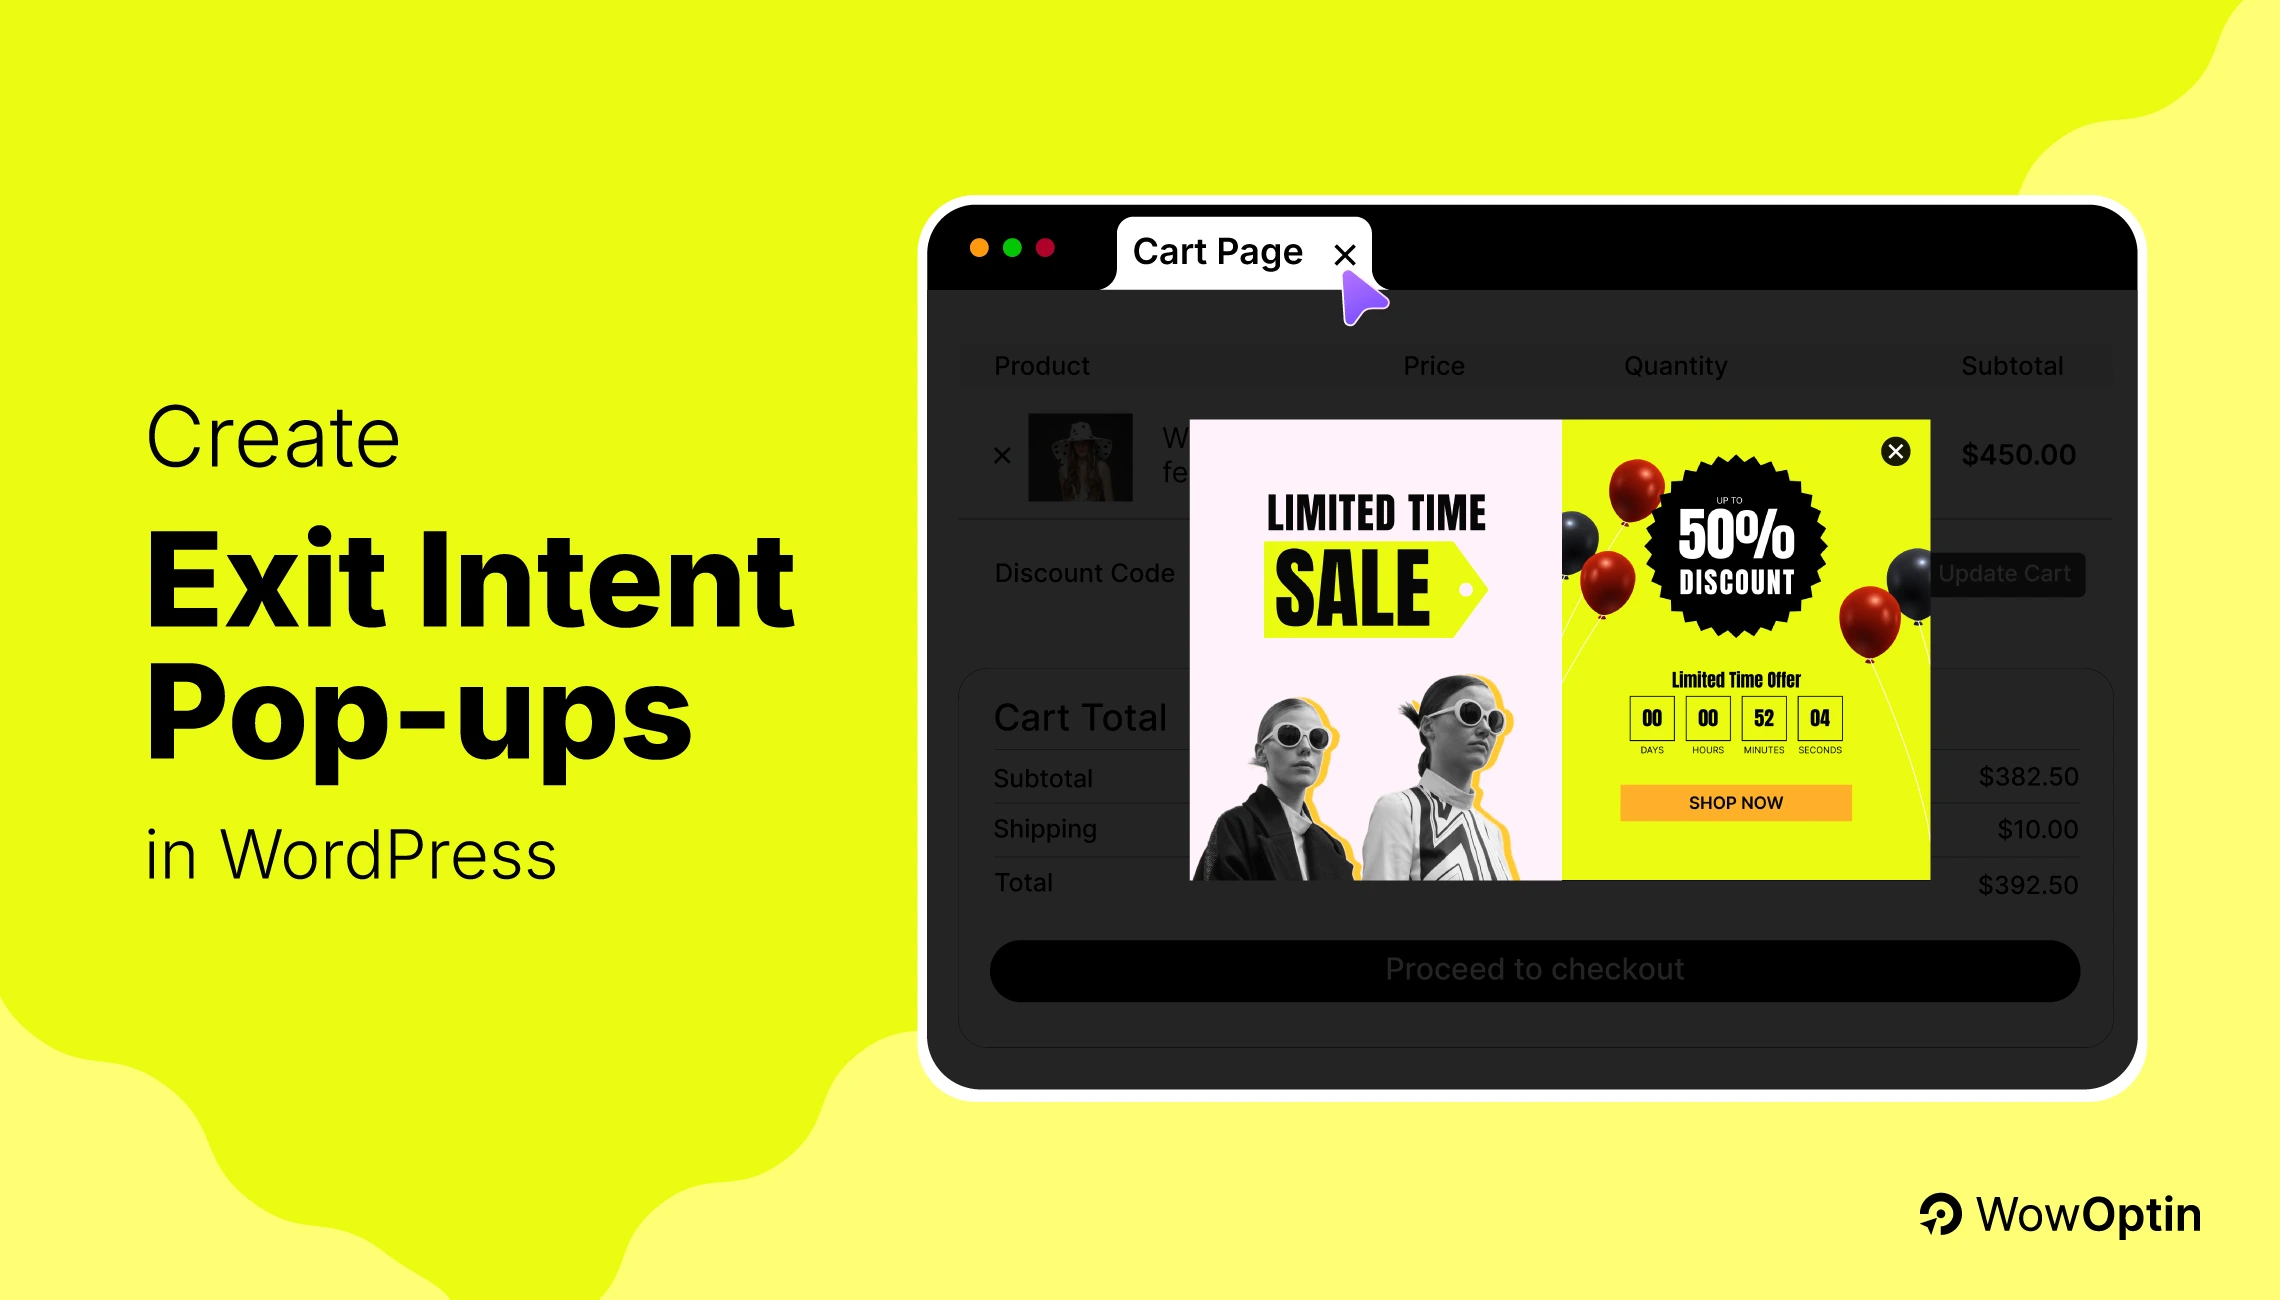
An exit-intent popup is a type of opt-in form or message that appears when a visitor is about to leave your website. Using advanced tracking, it detects when a user is moving their mouse toward the browser’s close button or back button and triggers a popup to capture their attention.
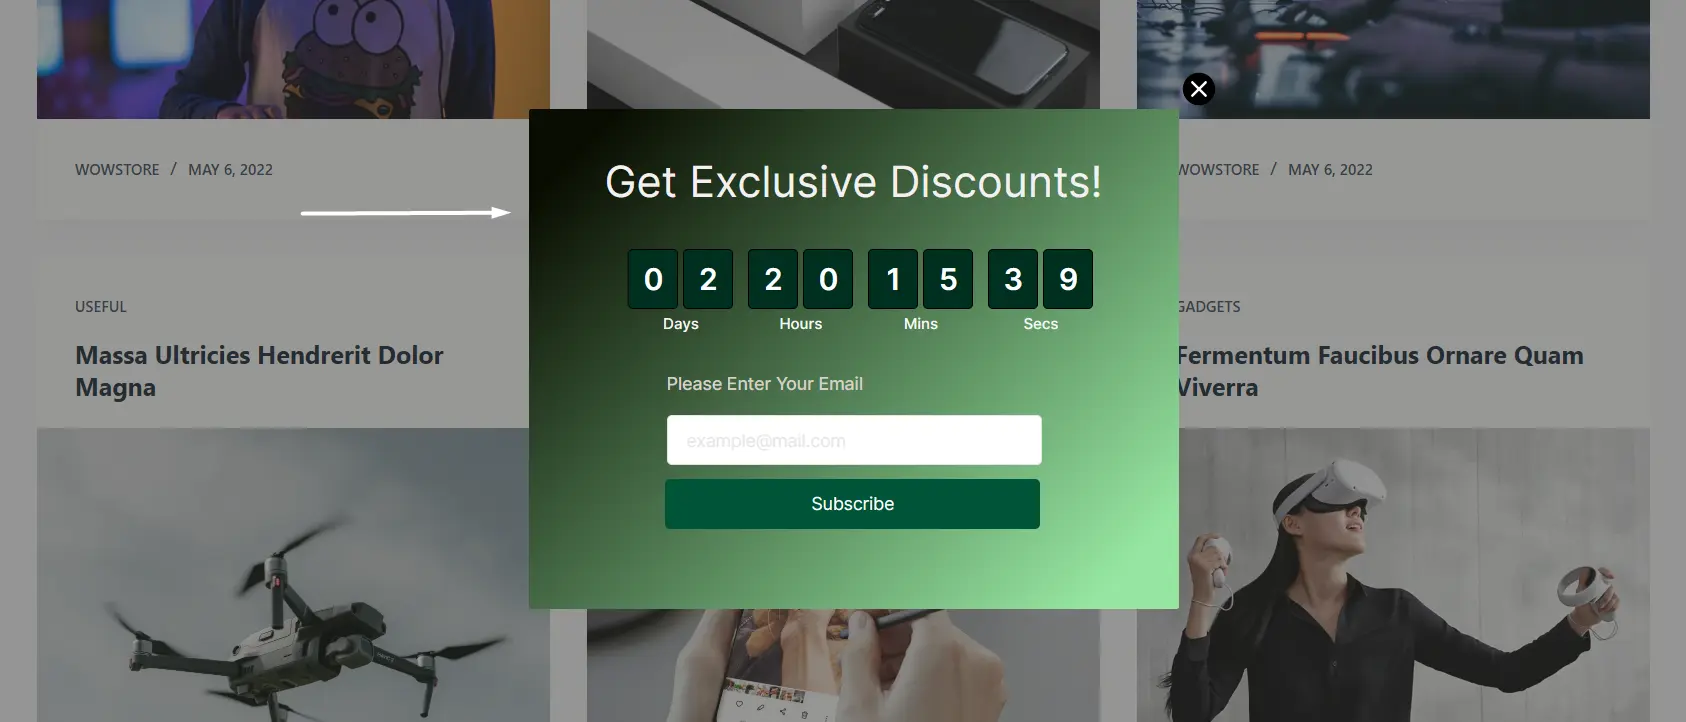
These popups are popularly used for offering discounts, collecting emails, or reminding users of abandoned carts. In WordPress, you can easily create exit-intent popups using lead generation plugins like WowOptin, which offers no-code solutions with advanced targeting features.
Practical Use Cases & Examples of Exit-Intent Popups
Here are some of the best examples of exit-intent popups:
- Discount Offers: “Wait! Get 15% off your first order if you subscribe now.”
- Content Upgrade: “Leaving so soon? Download our free eBook before you go!”
- Abandoned Cart Reminder: “You left some items in your cart. Complete your purchase now and get free shipping!”
- Survey Popups: “Before you leave, tell us how we can improve your experience.”
- Loyalty Rewards: “Join our loyalty program and earn points for future discounts!”
What Are The Benefits Of Implementing Exit Popups For Your Website?
There are several practical benefits of utilizing exit-intent popups on a website. Here are the top reasons why you should consider it:
Boost Conversions: Exit popups offer one last chance to convert visitors before they leave. As you present a compelling offer such as a discount, free shipping, or exclusive access – you can encourage users to take action instead of abandoning your site.
Reduce Bounce Rates: You can re-engage with visitors using attention-grabbing messages with the help of exit popups. This helps increase user engagement and reduces the chance of losing potential customers.
Increase Email Subscribers: An exit-intent popup is an effective method for capturing email addresses. You can offer exclusive content like eBooks, cheat sheets, or access to special deals in exchange for an email – that helps grow your subscriber base.
Recover Abandoned Carts: For eCommerce websites, exit popups act as reminders for users who leave items in their shopping carts. Adding urgency, like “Complete your purchase within 10 minutes and get free shipping,” can bring customers back to checkout.
Gain Insights: Using an effective exit intent popup plugin like WowOptin, you can track and optimize your popups. You can learn why users are leaving or what resonates with them the most – giving you actionable insights to improve your site’s experience.
How to Create An Exit-Intent Popup: Step-by-Step Guide
Now that you know what an exit-intent popup is, its practical applications, and how it can benefit your site, it is time to understand how to create an exit-intent popup in detail.
Step-1: Install A Suitable Popup Plugin Like WowOptin
To create an exit-intent popup, first, you will need a popup builder plugin that allows you to create and manage opt-ins. There are many amazing opt-in plugins in the industry.
But the one we recommend is WowOptin – it is an all-in-one powerful lead generation toolkit that comes with a unique drag-and-drop functionality for creating engaging popups in minutes!
And on top of that, WPXPO, the company behind WowOptin, offers an amazing deal with its lifetime plan. You get:
- Unlimited pageviews
- Unlimited Sites
- Lifetime updates

To get started with the plugin, check out the installation process.
After installing WowOptin, you will be greeted with a helpful dashboard where you can see the important numbers such as unique visitors, impressions, page views, and so on.
Step-2: Create Your Exit-Intent Popup
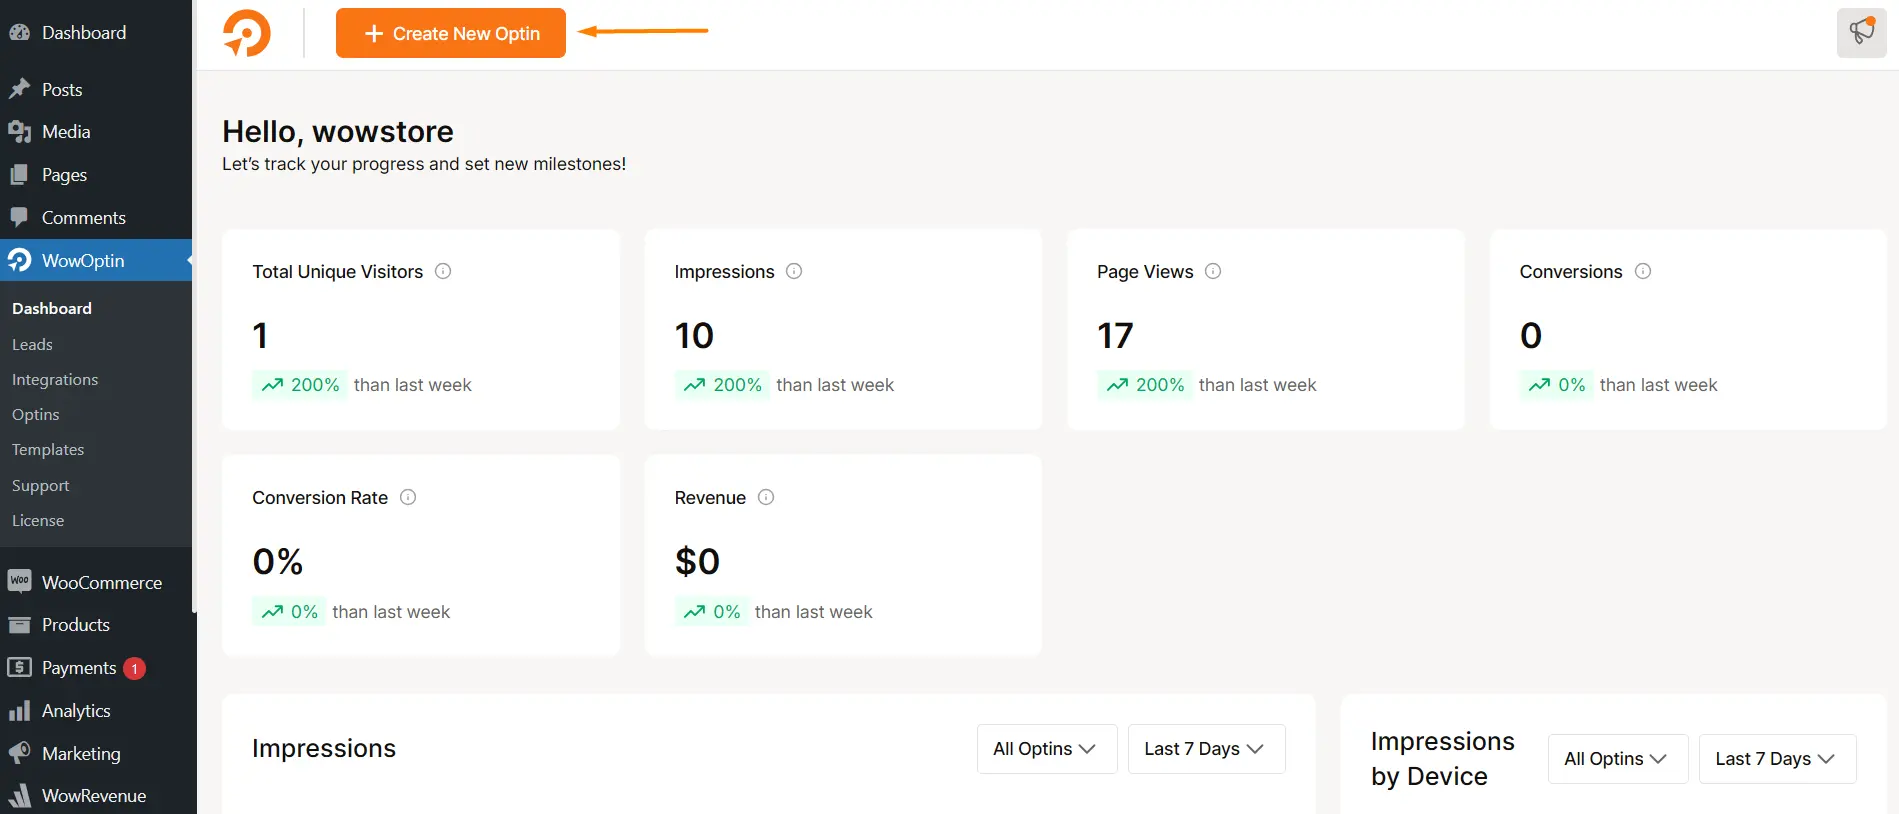
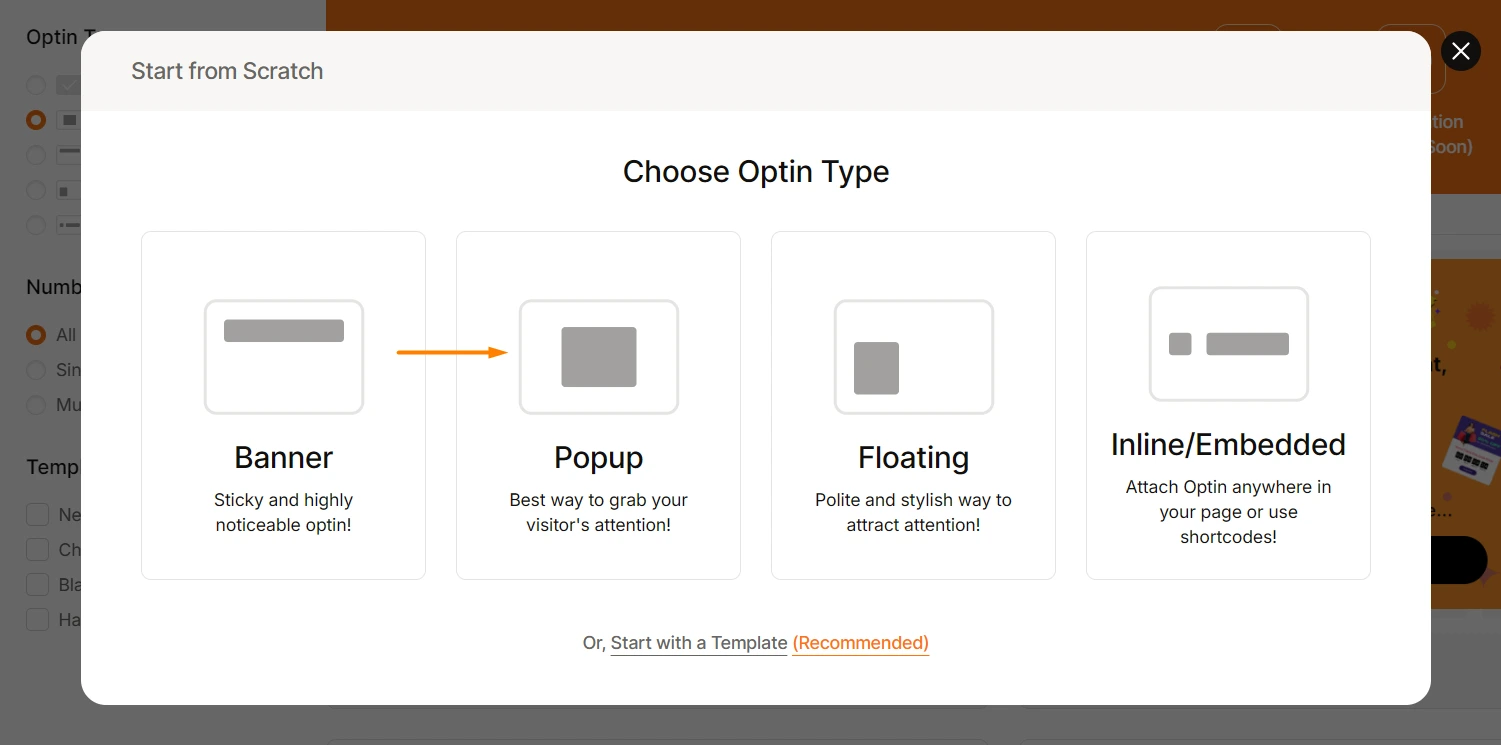
From this dashboard, click on the button “Create New Optin”. It will direct you to a new page where you can choose to start creating a popup from scratch. Alternatively, you can utilize the premade templates to get started quickly.
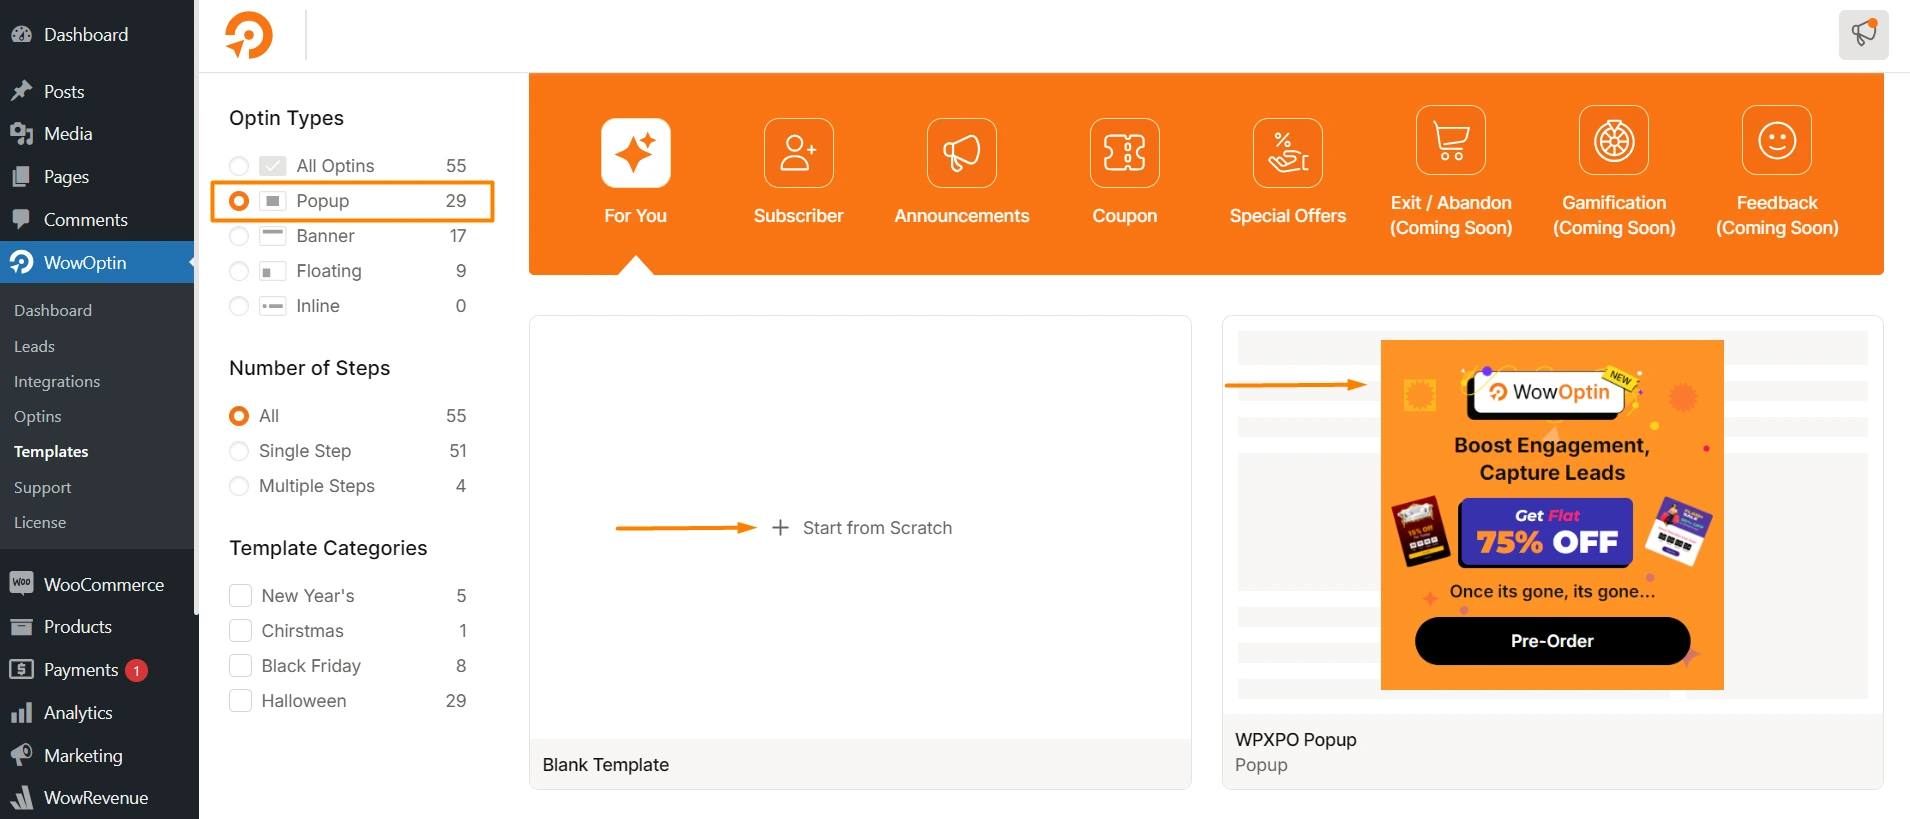
If you select the option “Start from Scratch”, you will get to choose the type of opt-in you want to create. As we will create an exit-intent popup, we will choose the option “Popup”.
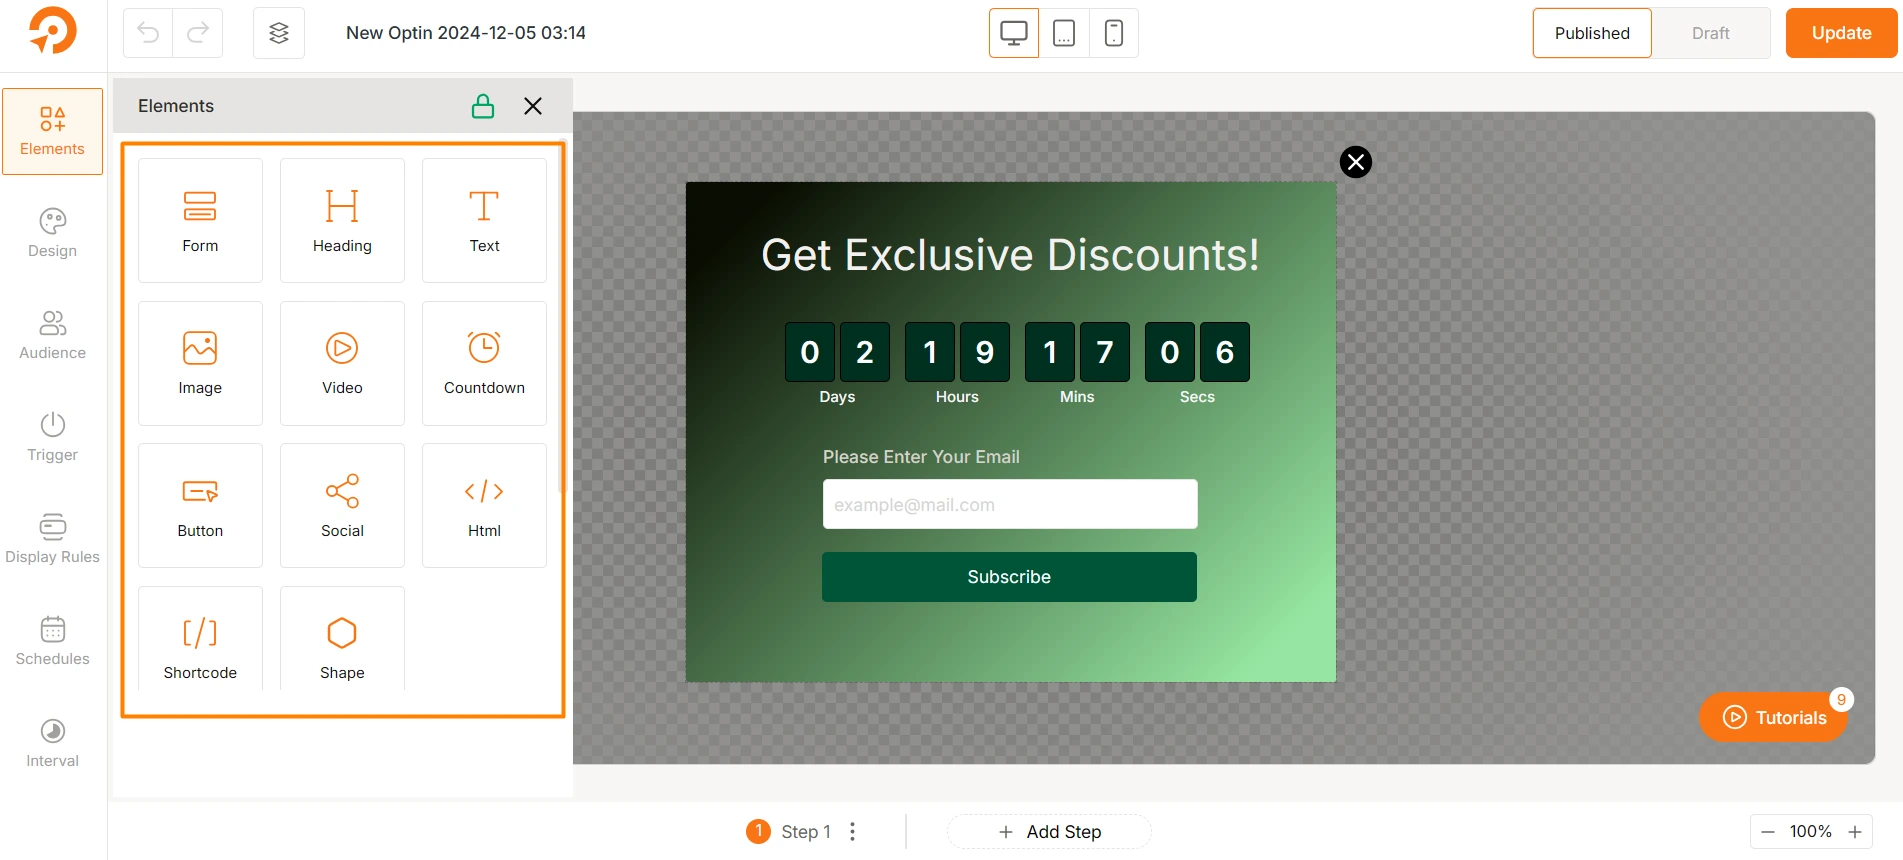
Now it will direct you to a new page where you can add essential elements to create your preferred popup. For example, you can add forms to collect user’s email. You can showcase special offers by adding a countdown timer element. The possibilities are endless.
Step-3: Design the Popup
Now, in this step, you need to design your popup so that it is eye-catching enough to grab the attention of visitors. Using WowOptin, you can easily modify several design aspects of a popup optin.
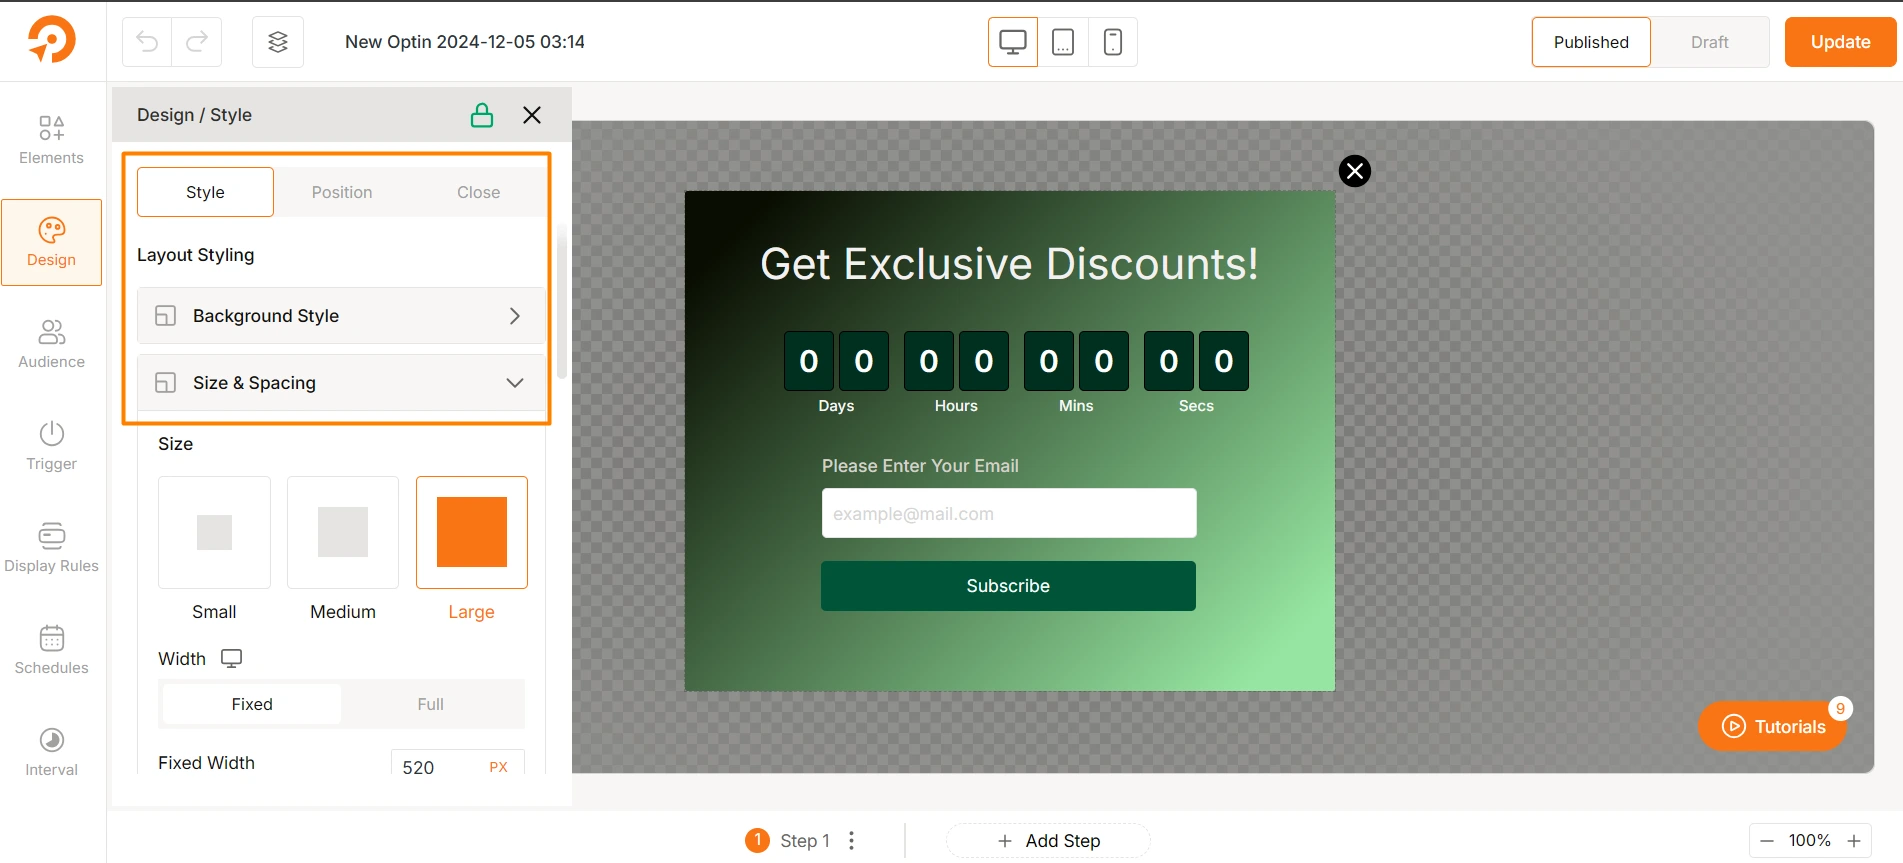
For example, you can change the background color of the overall popup. Also, you can change it for individual elements you have added to the optin.
Also, you can decide the size and spacing for the popup so that it matches perfectly with your website design. There are many other design options available – border style, box shadow, animation settings, overlay settings and so on.
As already mentioned, you can select an element and change its style to further customize the look of the exit-intent popup.
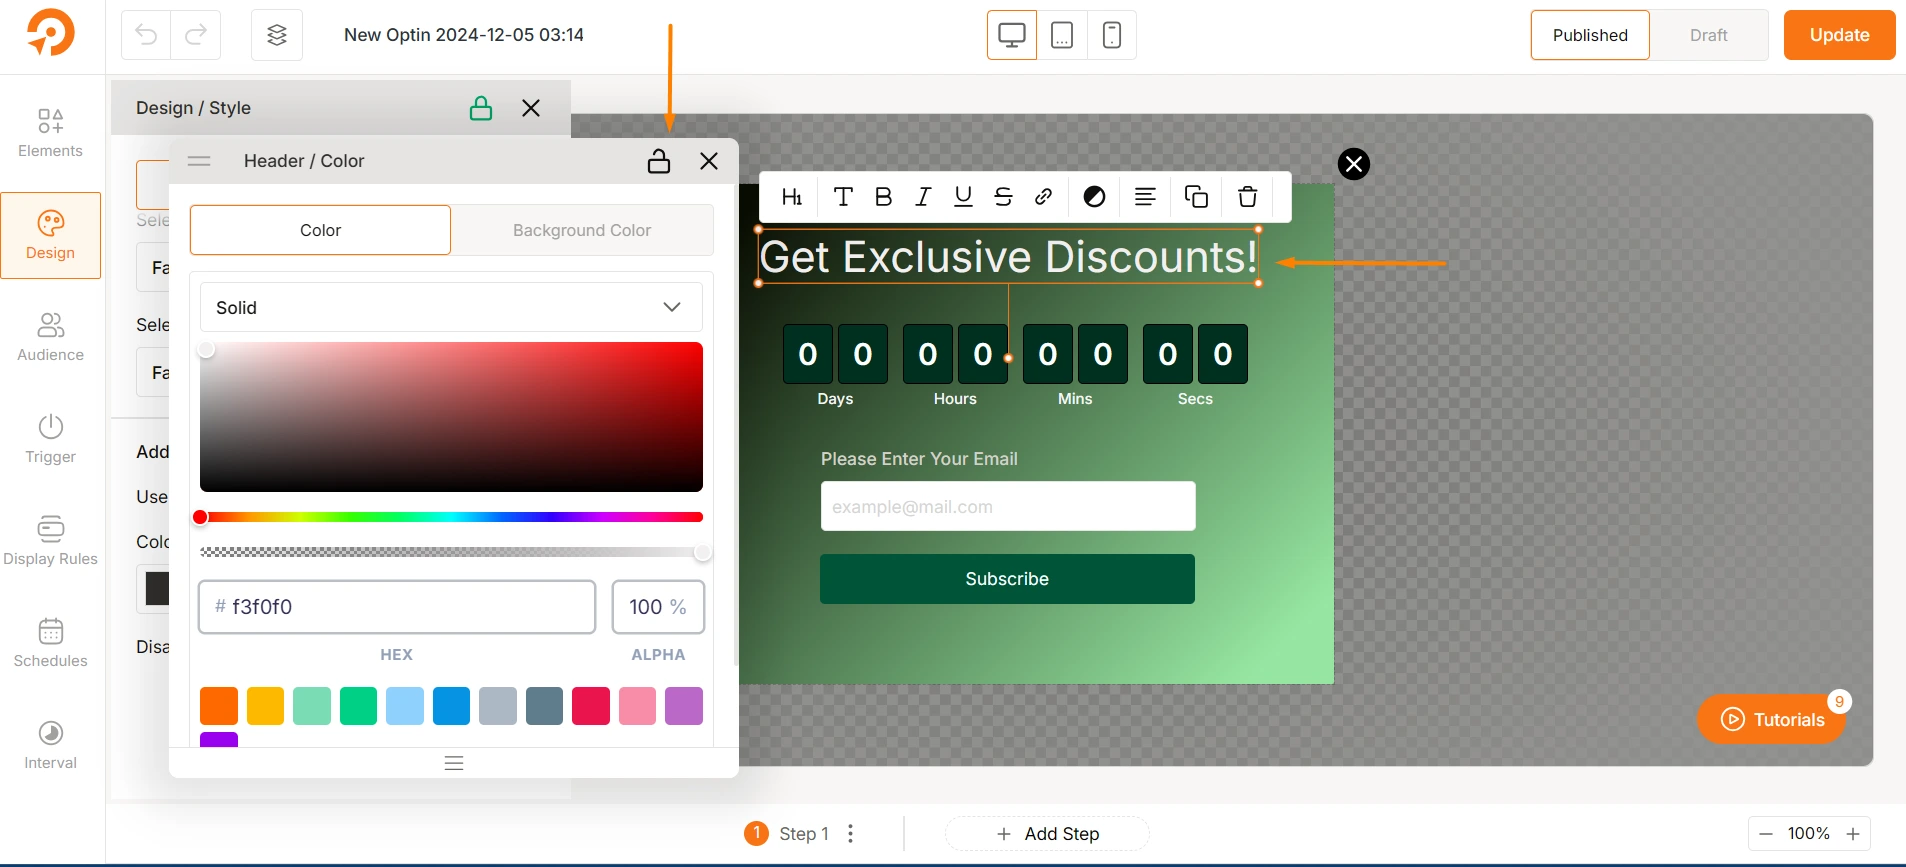
For instance, if you want to change how the Heading element should look, you can simply select the element and you will notice a floating bar from where you can change different settings like typography, color, alignment, and so on.
Feel free to check out the settings in detail as there are many design options that will help you create a highly-converting exit-intent popup.
Step-4: Set up Exit-intent Trigger
This is the most important step for creating an exit popup in WordPress – displaying the popup at the right time just before visitors are about to leave your website.
To do that, simply head over to the Trigger tab and here you will get to set different triggers including Exit Intent.
Click on the Add New Trigger and from the dropdown, select Exit Intent.
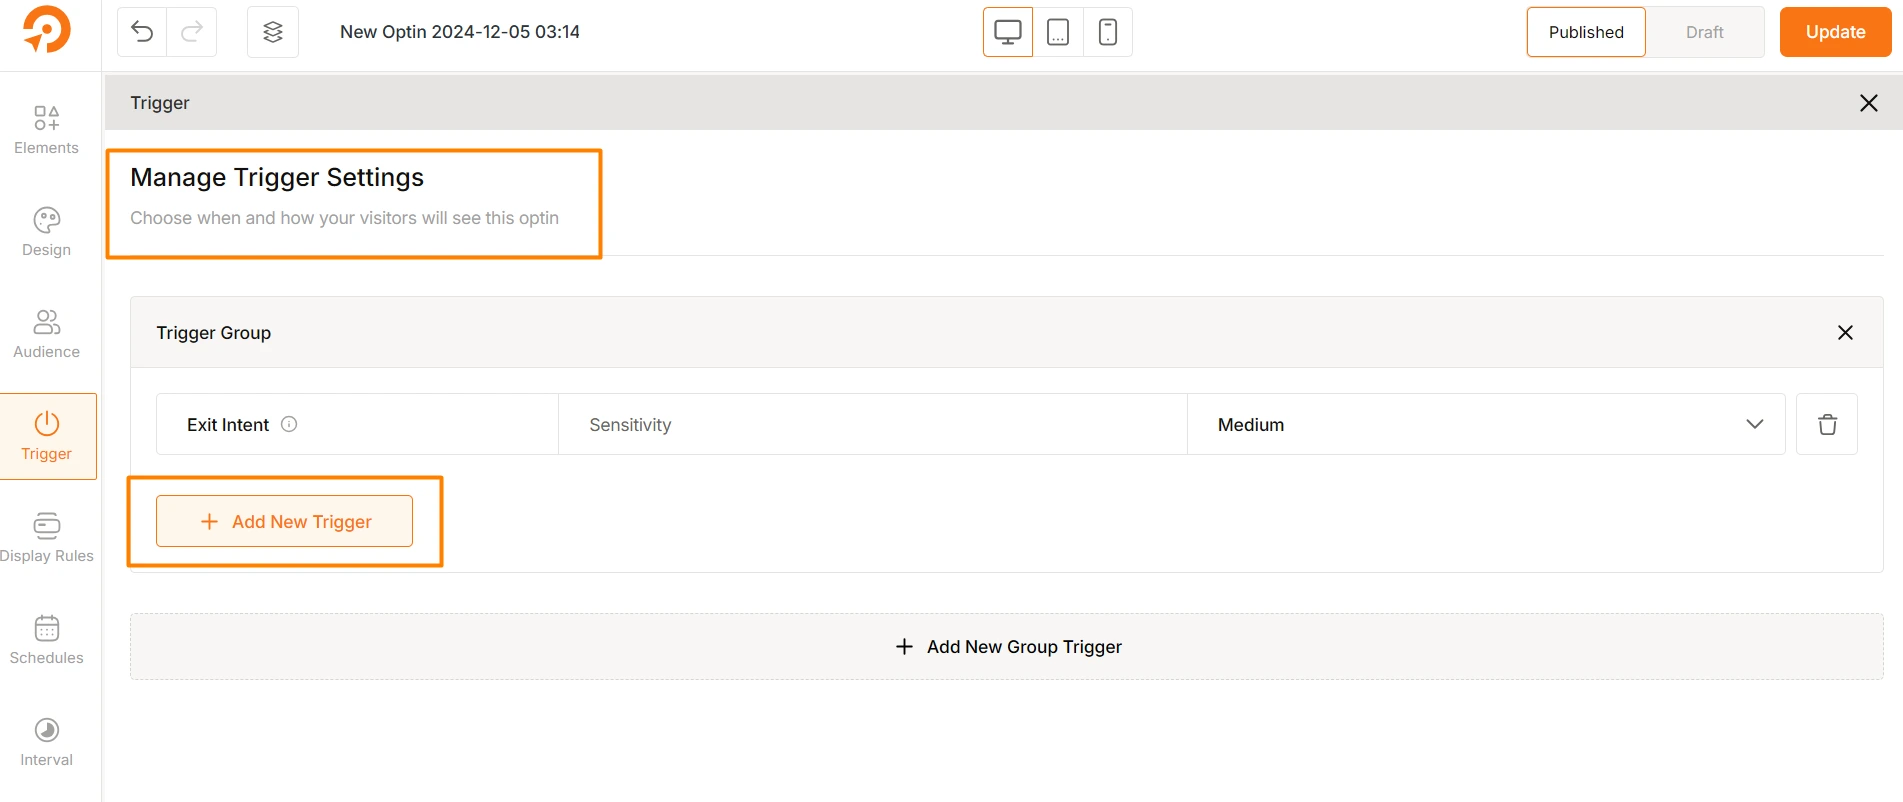
In addition, choose the sensitivity level for the trigger. For High sensitivity, even a slight mouse movement toward the edge of the close button of the browser tab will trigger the popup. On the other hand, low sensitivity will have the opposite effect.
Step-5: Choose the Target Audience for the Popup
Next, a very important part of creating an exit-intent popup is setting up the target audience – meaning that people should see your popups when they visit your site.
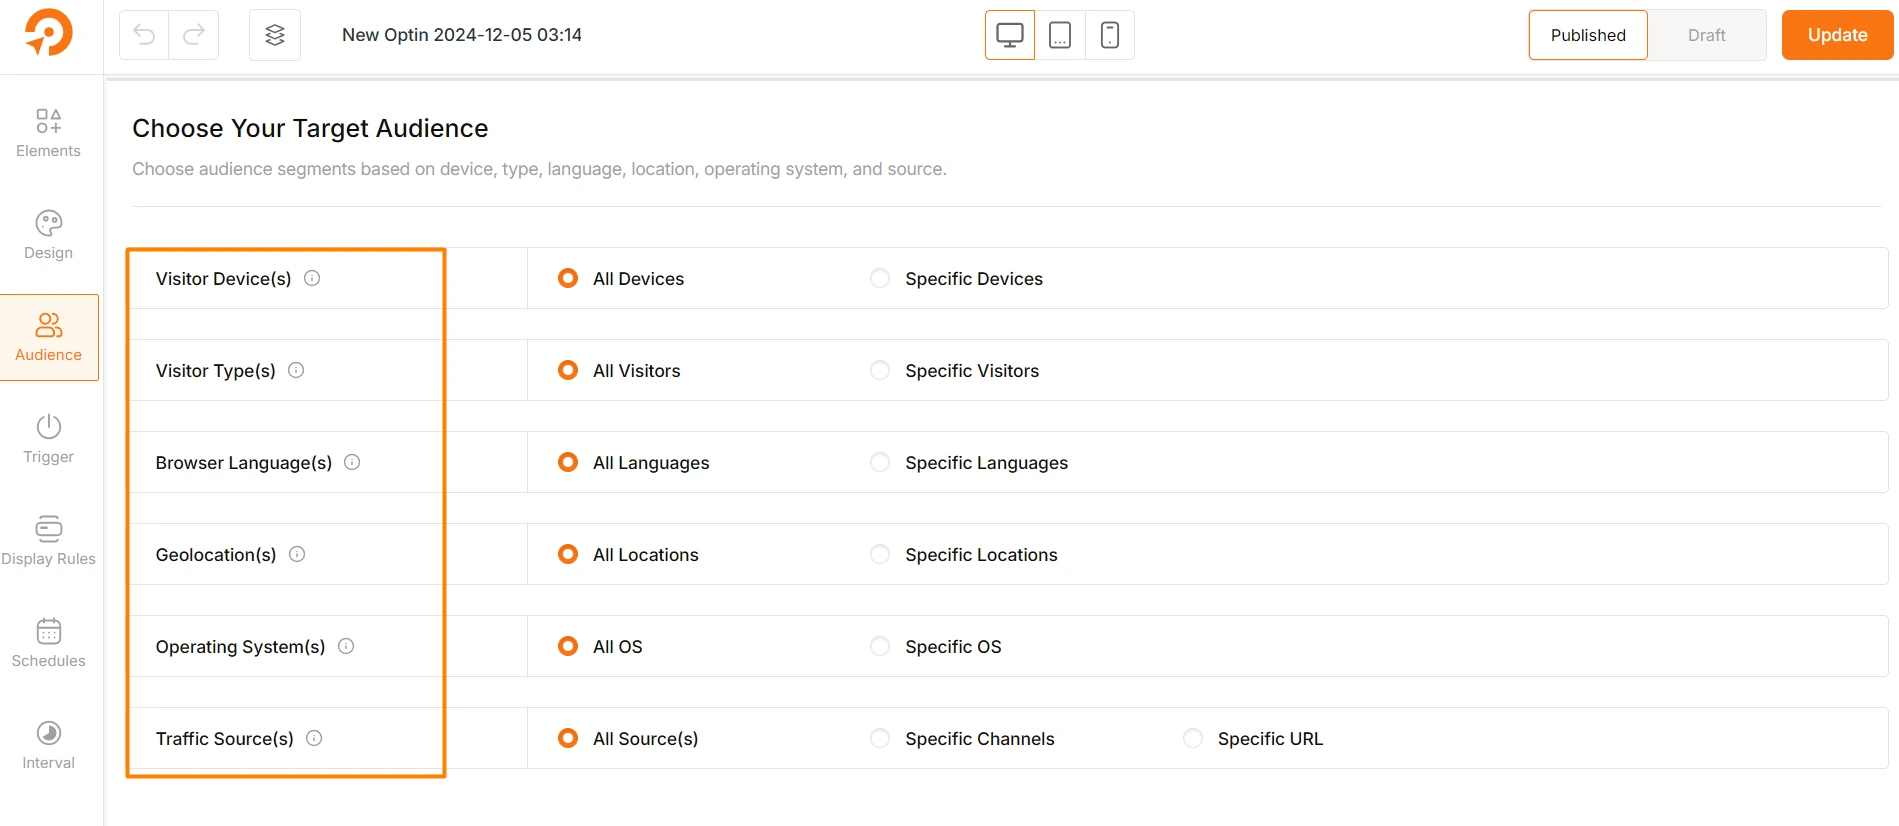
WowOptin makes this very intuitive. After designing your popup, simply move to the Audience tab and here you should see various options such as Visitor Devices, Visitor Types, Browser Languages, Traffic Sources, and so on.
For example, if you want to show your popups to people who visit your site organically through search, you can specify that in the Traffic Sources settings.
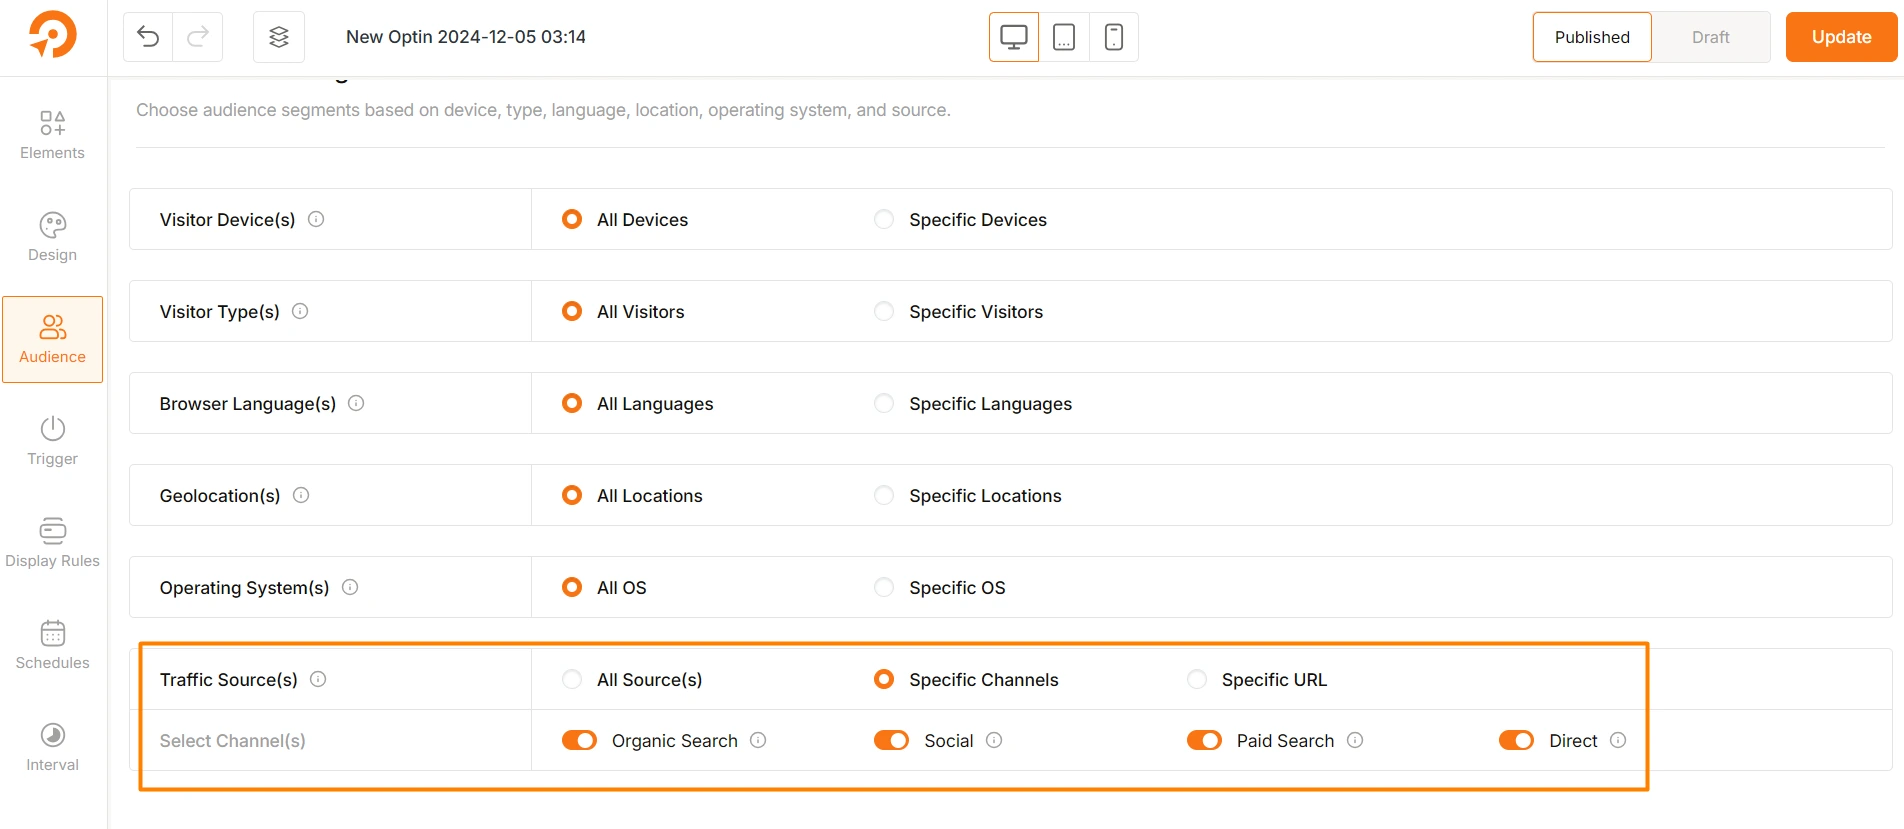
Step-6: Set up Where to Display the Popup
You have designed your popup and set up the exit-intent trigger, but on which pages on your website should the popup be displayed? You should have that control.
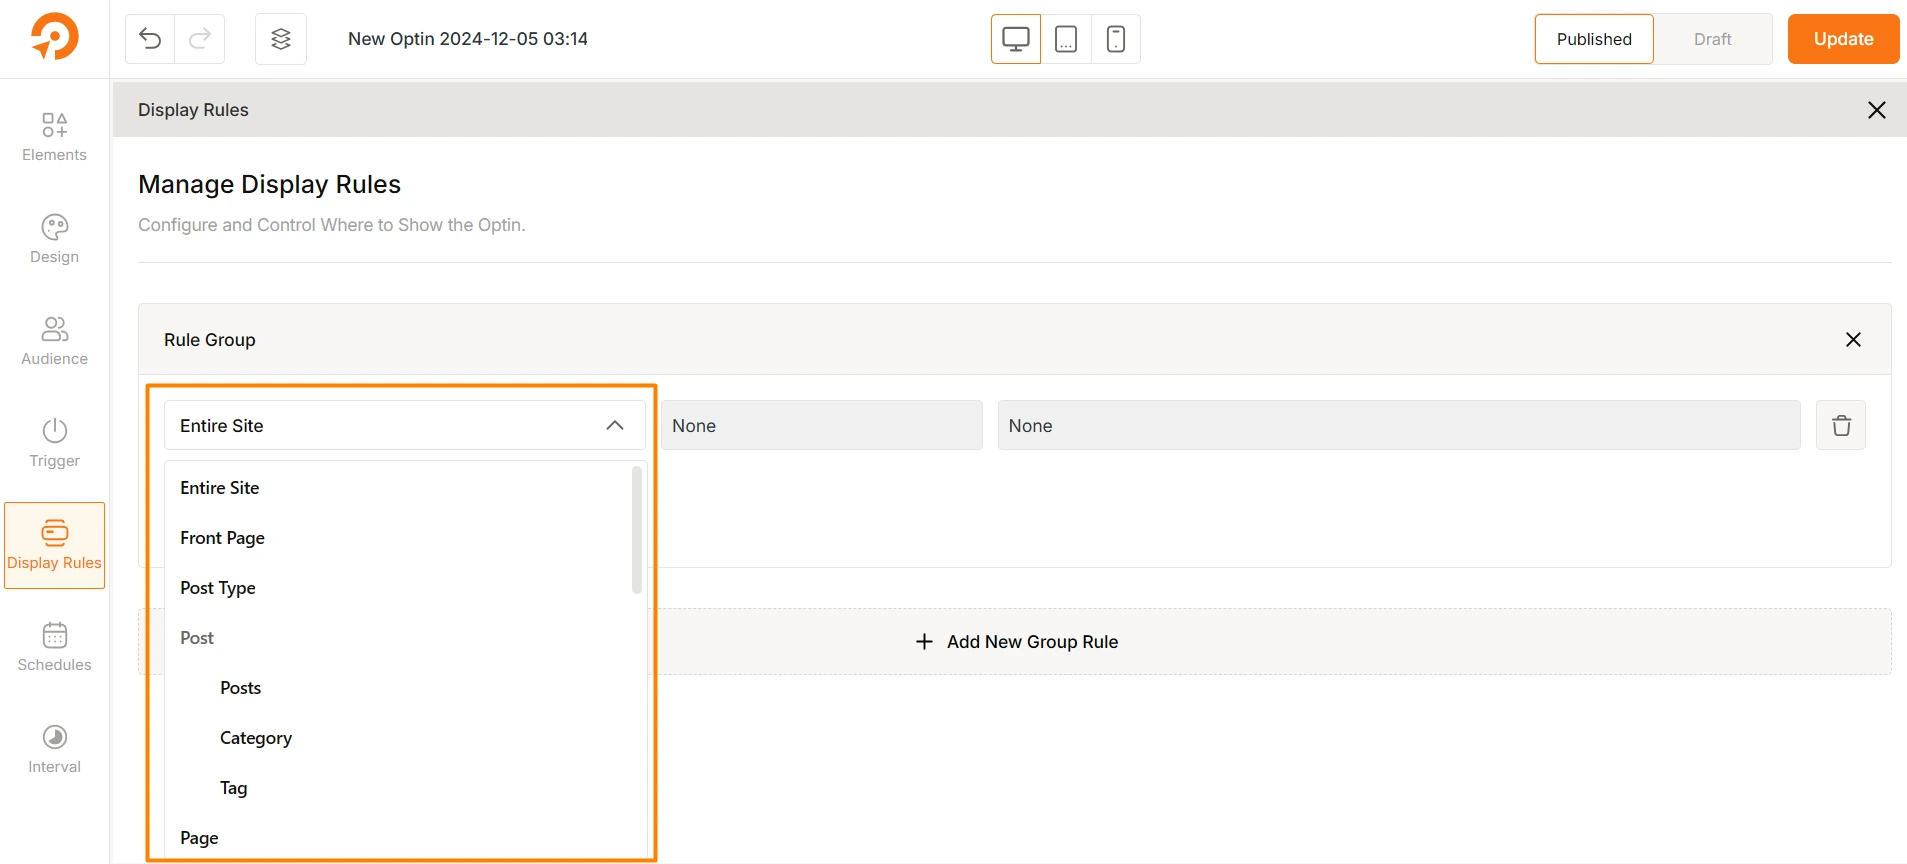
For that reason, WowOptin lets you set up page-level targeting for any opt-in. Simply check the Display Rules tab and you will see different rule groups. From the dropdown, you can choose to show the popup on the entire site, on the front page, for specific post types, posts, posts with specific categories or tags, pages, and so on.
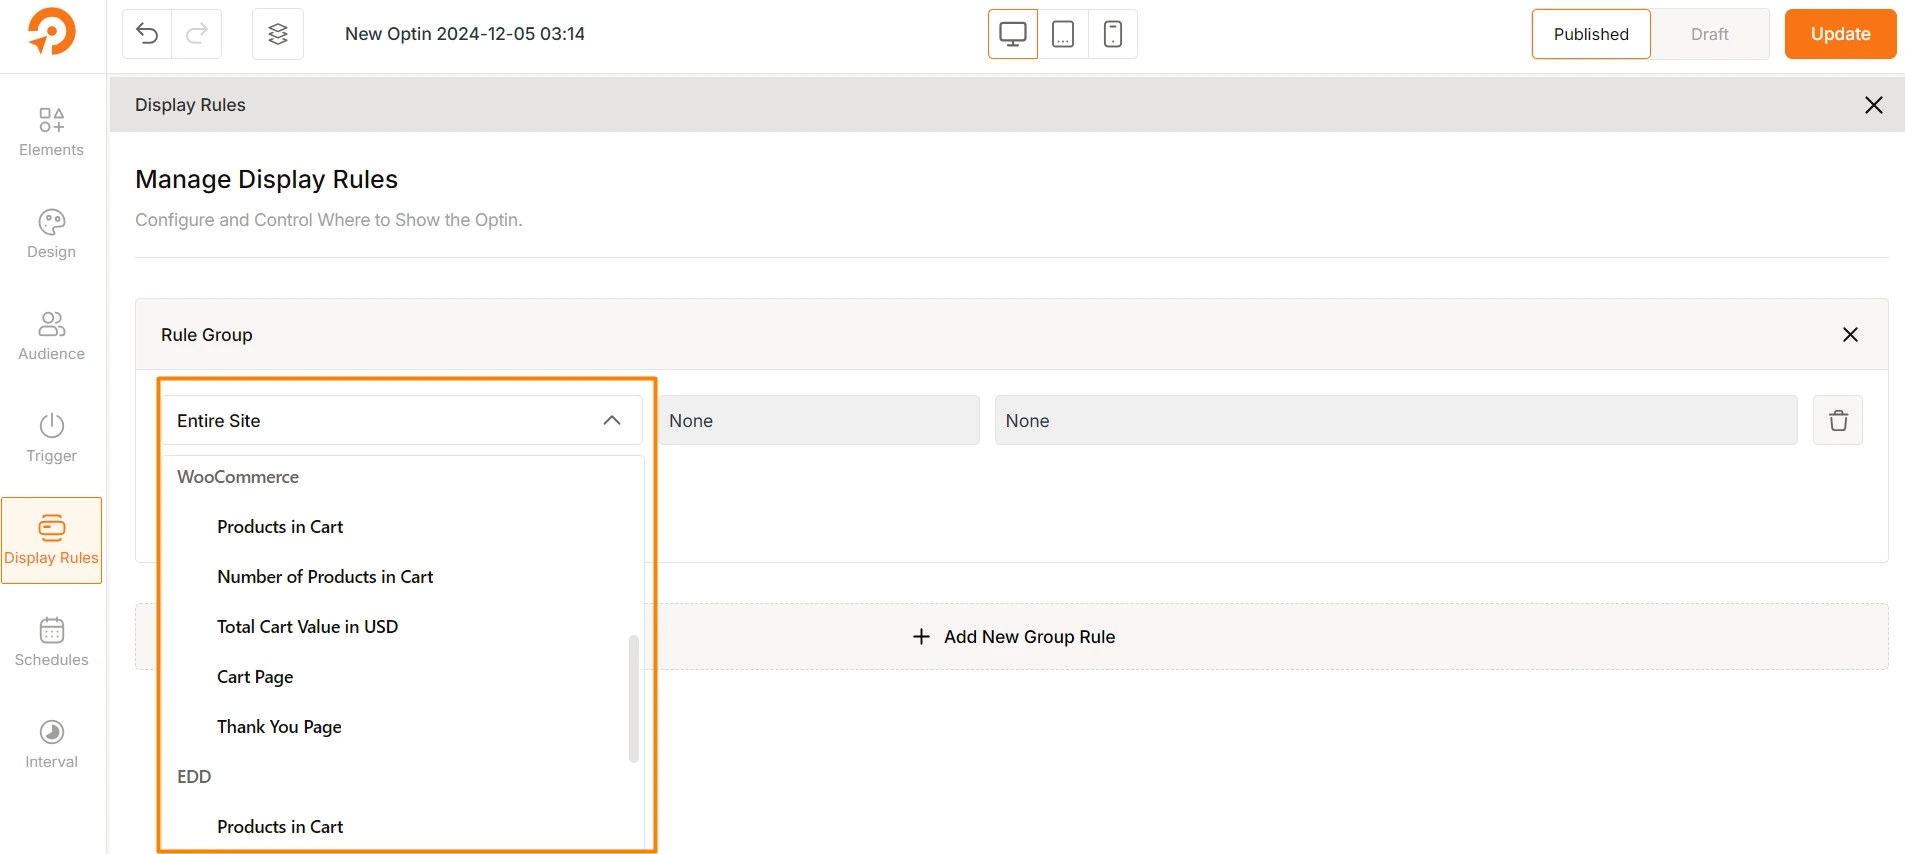
Also, WowOptin easily integrates with WooCommerce and EDD, so if you are a user of any, you can display the popup based on different conditions. For example, you can showcase the exit-intent popup when there are specific products in customer’s cart. There are more conditions to take advantage of.
You can find more details here:
Customize Further with Additional Settings
There are some additional settings that you can take advantage of to create even better exit-intent popups.
For instance, you can plan ahead and set a schedule for the popup to be visible on your site during a specific season.
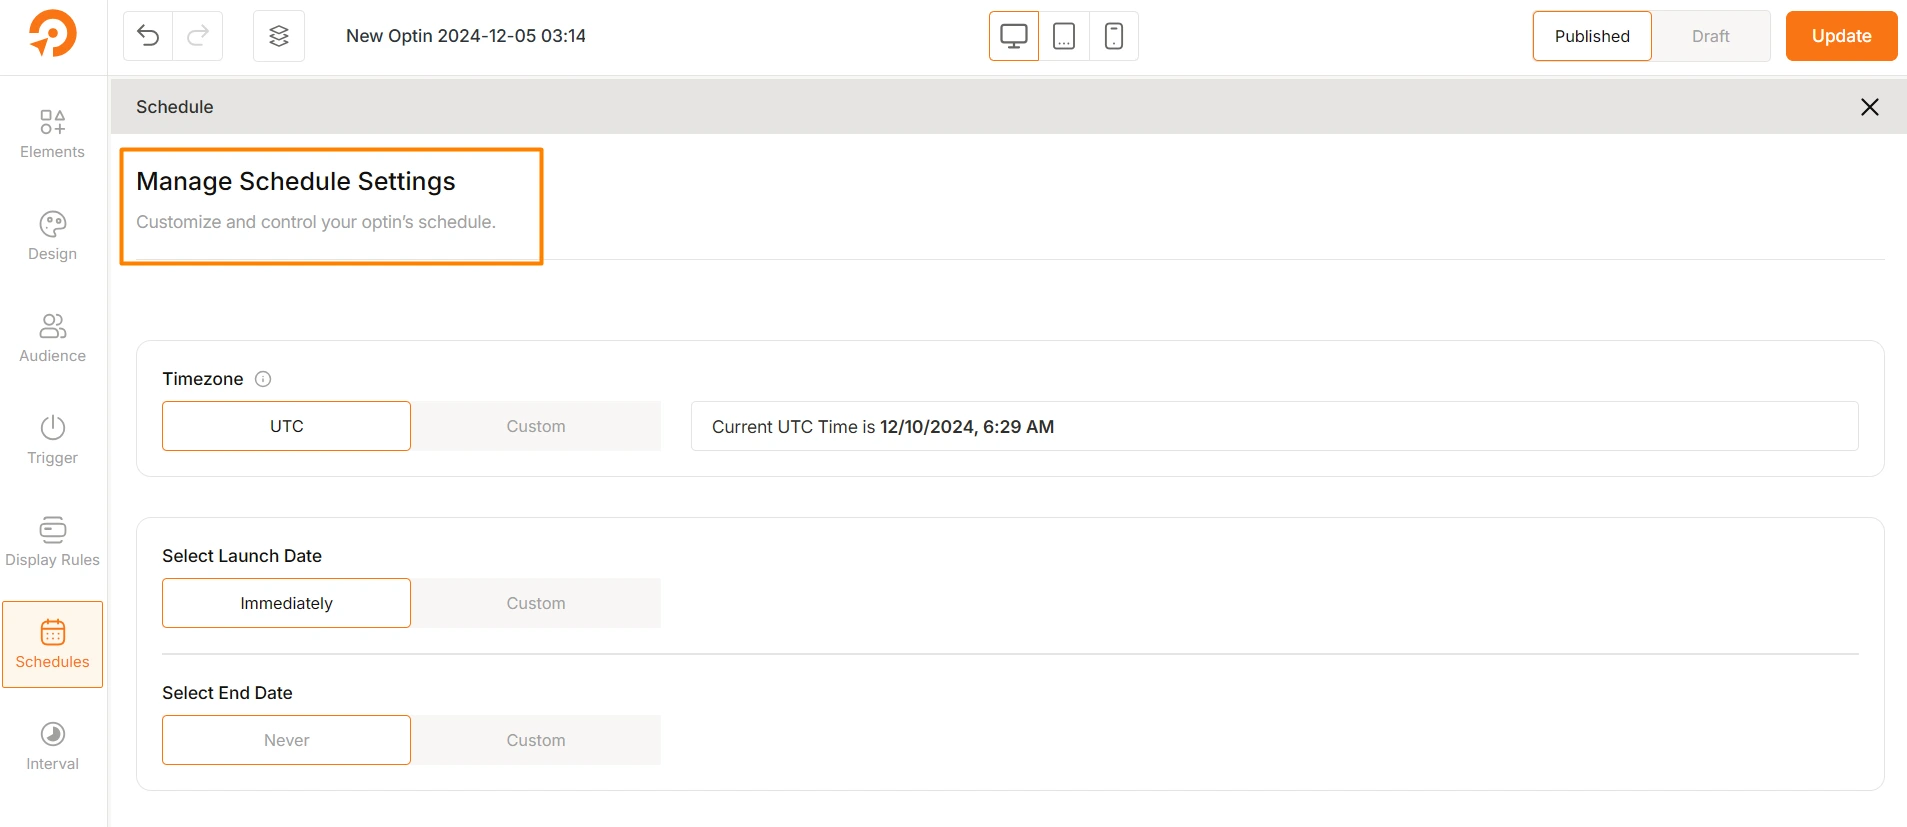
You can easily set the launch date and end date for the exit-intent popup. Also, there is an option to show the opt-in every day or specific weekdays in between the timeframe you have set.
Also, you can control the interval of the popup – meaning you have the choice to display a popup on every page load or on specific conditions.
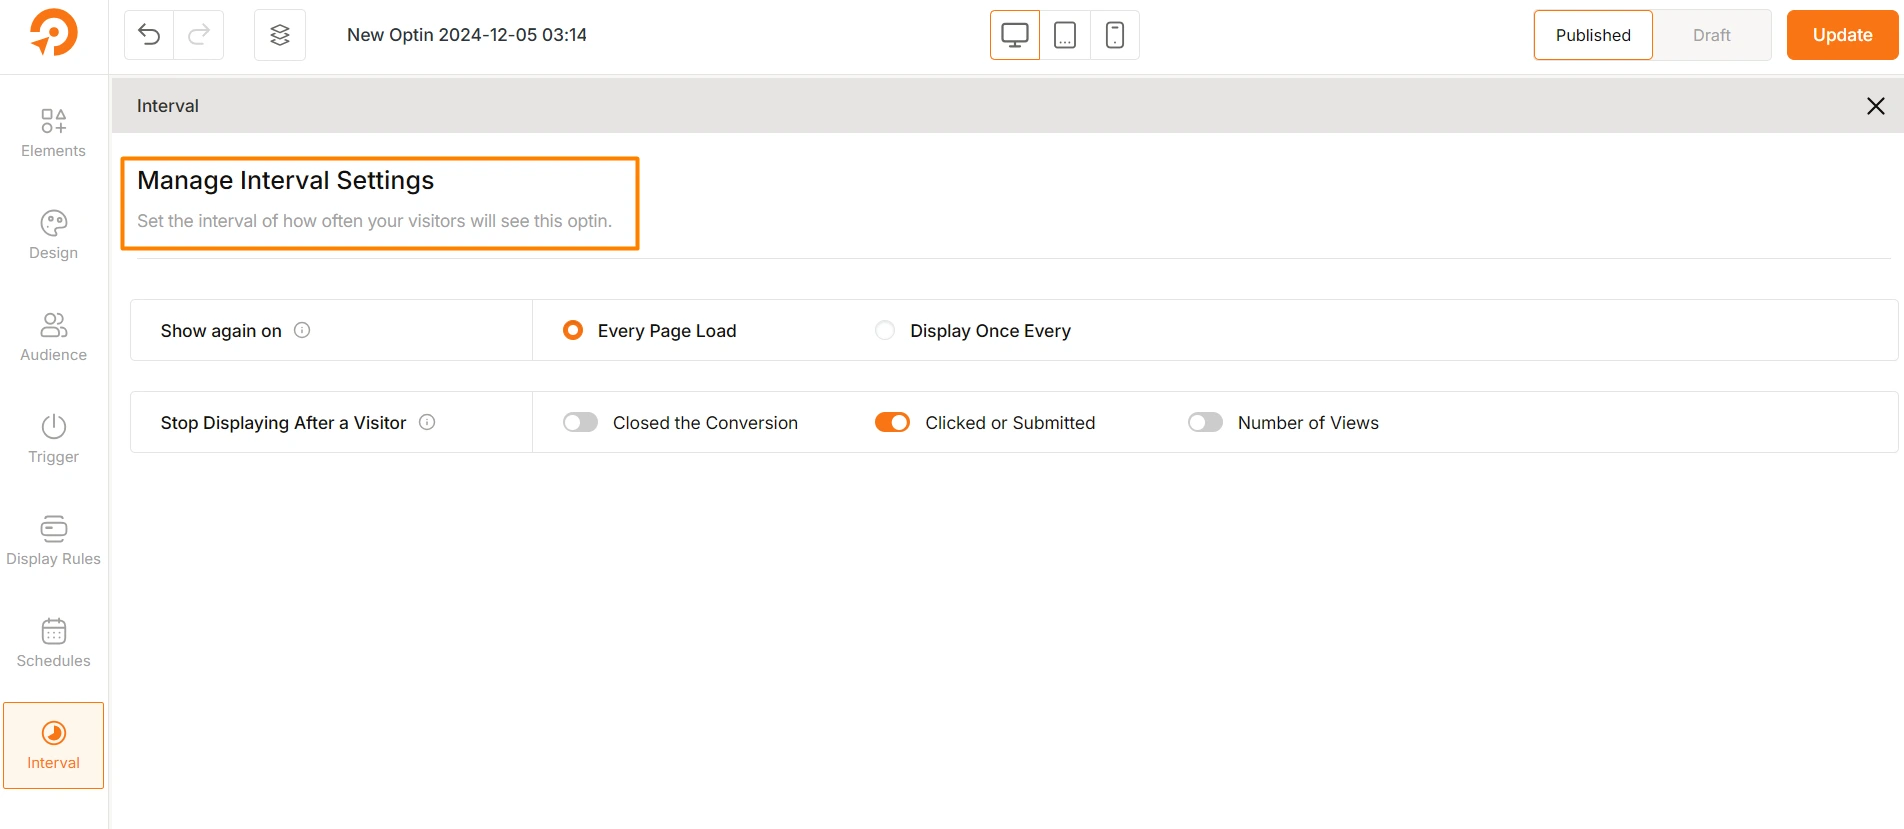
In addition, it is possible to stop displaying the popup based on how users interact with it.
Tips to Create Highly-Converting Exit-Intent Popups For Your Site
Creating exit-intent popups is one thing but making it conversion-focused is another thing to worry about. For that reason, I am sharing effective strategies that have helped me create highly converting exit-intent popups for my site.
Offer Value: The key to a successful popup is making it irresistible. Offer something that genuinely benefits the user, like a discount, free trial, exclusive guide, or an upgrade they can’t refuse. Ensure the offer is relevant to the visitor’s interests.
Use Clear and Compelling Copy: The text should instantly communicate the value. Phrases like “Don’t Miss Out!” or “Wait – Grab 20% Off Now!” work well. Avoid lengthy explanations; keep it simple, persuasive, and direct.
Design for Impact: A visually appealing popup grabs attention. Use bold colors, eye-catching images, and readable fonts. Ensure the design aligns with your site’s branding and highlights the call-to-action (CTA).
Target Specific Audiences: Optimize your popups based on user behavior and demographics. For example, you should show different offers to first-time visitors versus returning ones or provide region-specific deals. Tools like WowOptin make audience segmentation easy.
Add a Strong Call-to-Action (CTA): The CTA is what drives action. Use action-oriented phrases like “Get My Discount,” “Yes, I Want This,” or “Sign Me Up!” Place the CTA button prominently and ensure it’s clickable.
Test and Optimize: Regularly A/B tests various elements of your popups – such as design, copy, timing, and offers to see what resonates most with your audience. Use analytics to track results and tweak accordingly.
Summing Up
Displaying exit-intent popups can be an effective tool when it comes to boosting conversions and growing your audience. When you use the right tools like WowOptin and follow best practices, you can create popups that don’t just stop visitors from leaving but inspire them to take action.
Remember, you need to keep your offers relevant, your design captivating, and your timing suitable – to get an improved conversion rate from the optins.
Frequently Asked Questions
How Does An Exit-Intent Popup Work?
Exit-intent technology uses mouse-tracking to detect when a user is moving their cursor toward the browser’s close button or away from the site. When triggered, they display a targeted message or offer to re-engage the visitor.
Do Exit Popups Improve Conversion?
Yes, exit popups are highly effective when used strategically. When you offer relevant incentives like discounts, free resources, or exclusive content, users are more likely to convert. However, the success of exit-intent popups will depend on factors such as design, messaging, and timing.
What Is The Purpose of An Exit-Intent Popup on An E-commerce Website?
The primary purpose of an exit-intent popup on an eCommerce website is to prevent cart abandonment and boost sales. These popups detect when a user is about to leave the site and present an enticing offer – such as a discount, free shipping, or a reminder of items left in their cart.
What Are The Best Plugins For Creating Exit-Intent Popups In WordPress?
Some popular plugins include WowOptin, OptinMonster, and Elementor Pro. Among these, WowOptin stands out for its unique Canva-like drag-and-drop builder and lifetime updates with a very affordable plan.
How can I track the performance of my exit-intent popups?
You can use lead generation plugins like WowOptin to measure impressions, conversions, and engagement rates. You can then use these insights to optimize your campaigns for better results.
