Did you ever land on a page and have an image popped up promptly? It grabbed your attention instantly, didn’t it? That’s what we call an Image Popup.
Adding image popups on websites is widely used to increase conversion on websites. This is very true for new WordPress site owners – people who are just getting started.
Whether you’re promoting a product, showing a banner, or just grabbing attention with a visual — image popups work. But doing it the right way (without slowing down your site or adding bloat) can be tricky if you don’t know where to start.
Here, I’ll walk you through three simple methods to create an image popup in WordPress:
✅ Without a plugin using lightweight HTML, CSS & JS
✅ With click or hover trigger using custom or plugin-based options
✅ Using a visual popup builder for easier design and control
You’ll also find a quick plugin comparison, why I chose WowOptin, and a few expert tips to make your image popup more effective.
Let’s get started — no clutter, no confusion.
What Is an Image Popup?
An image popup in WordPress means showing an image inside a popup window when someone visits or interacts with your site. It grabs attention without redirecting users to a different page.
You’ll often see image popups on portfolio websites, galleries, and online stores. They’re commonly used to showcase featured visuals, highlight promotions, or even collect leads.
For example, online store owners often use them to promote special offers or new arrivals. Others might use image popups to encourage reviews or highlight key announcements.
Why should You Use Image Popups?
Here’s what a well-executed image popup can do for your site:
Boost sales: Promote deals or bestsellers directly to potential customers.
Guide user flow: Nudge visitors toward specific pages or products.
Improve conversion: A compelling popup can motivate instant action.
Grow your audience: Use popups to collect emails and build your community.
In short, image popups are more than just flashy visuals — they’re powerful tools to drive engagement and results.
How does a WordPress Image Popup Work?
WordPress doesn’t come with a built-in image popup feature.
But the concept is simple — when a visitor lands on your site or interacts with an element (like clicking an image), a popup appears showing the image you want to highlight.
So what triggers an Image Popup?
On Click: A popup opens when a visitor clicks on a specific image or button. Perfect for product previews, CTAs, or gallery items.
On Hover: A popup appears when users hover their cursor over an element. Great for showing extra details or sneak peeks without interrupting the flow.
On Page Load or Exit: Some popups are set to display automatically — either when someone enters or is about to leave the site.
These triggers give you the flexibility to show images in the right place at the right time, without disrupting user experience.
You can implement these kinds of trigger on a image popup on your site in three ways. Let’s discover them.
The Ways to Pop Up an Image on WordPress
1. Add Image Popups with Custom Code
If you’re comfortable with code, you can create image popups using HTML, CSS, and sometimes JavaScript. It gives you full control and doesn’t require any plugins.
That said, if you’re not into coding, you might need help from a developer. Still, this is a great option if you want something lightweight and fully custom.
2. Use Your Theme’s Built-in Settings
Some WordPress themes offer image popup features out of the box — but with limitations. You’ll often need premium versions or companion plugins.
Here are a few that support this:
OceanWP – Requires the Ocean Extra plugin
Kadence – Needs Kadence Pro + Kadence Blocks
Salient – Available in the premium version
If your theme supports it, this method can be quick and efficient.
3. Use a WordPress Popup Plugin
The easiest and most flexible method? Use a dedicated plugin.
Plugins give you full visual control, customizable triggers, and a beginner-friendly interface. No code. No hassle.
In this guide, you’ll learn how to easily add WordPress image popups using a bit of code and a plugin (triggered by hover or click).
Way 1: How to Create an Image Popup in WordPress Without a Plugin
If you want to keep things lightweight and avoid plugins, you can manually add an image popup using HTML, CSS, and a little JavaScript. It’s a great way to learn and gives you full control over the behavior and appearance.
✅ Best for: Developers or users who are comfortable editing theme files or using a code snippet plugin.
Let’s dive into the step by step process.
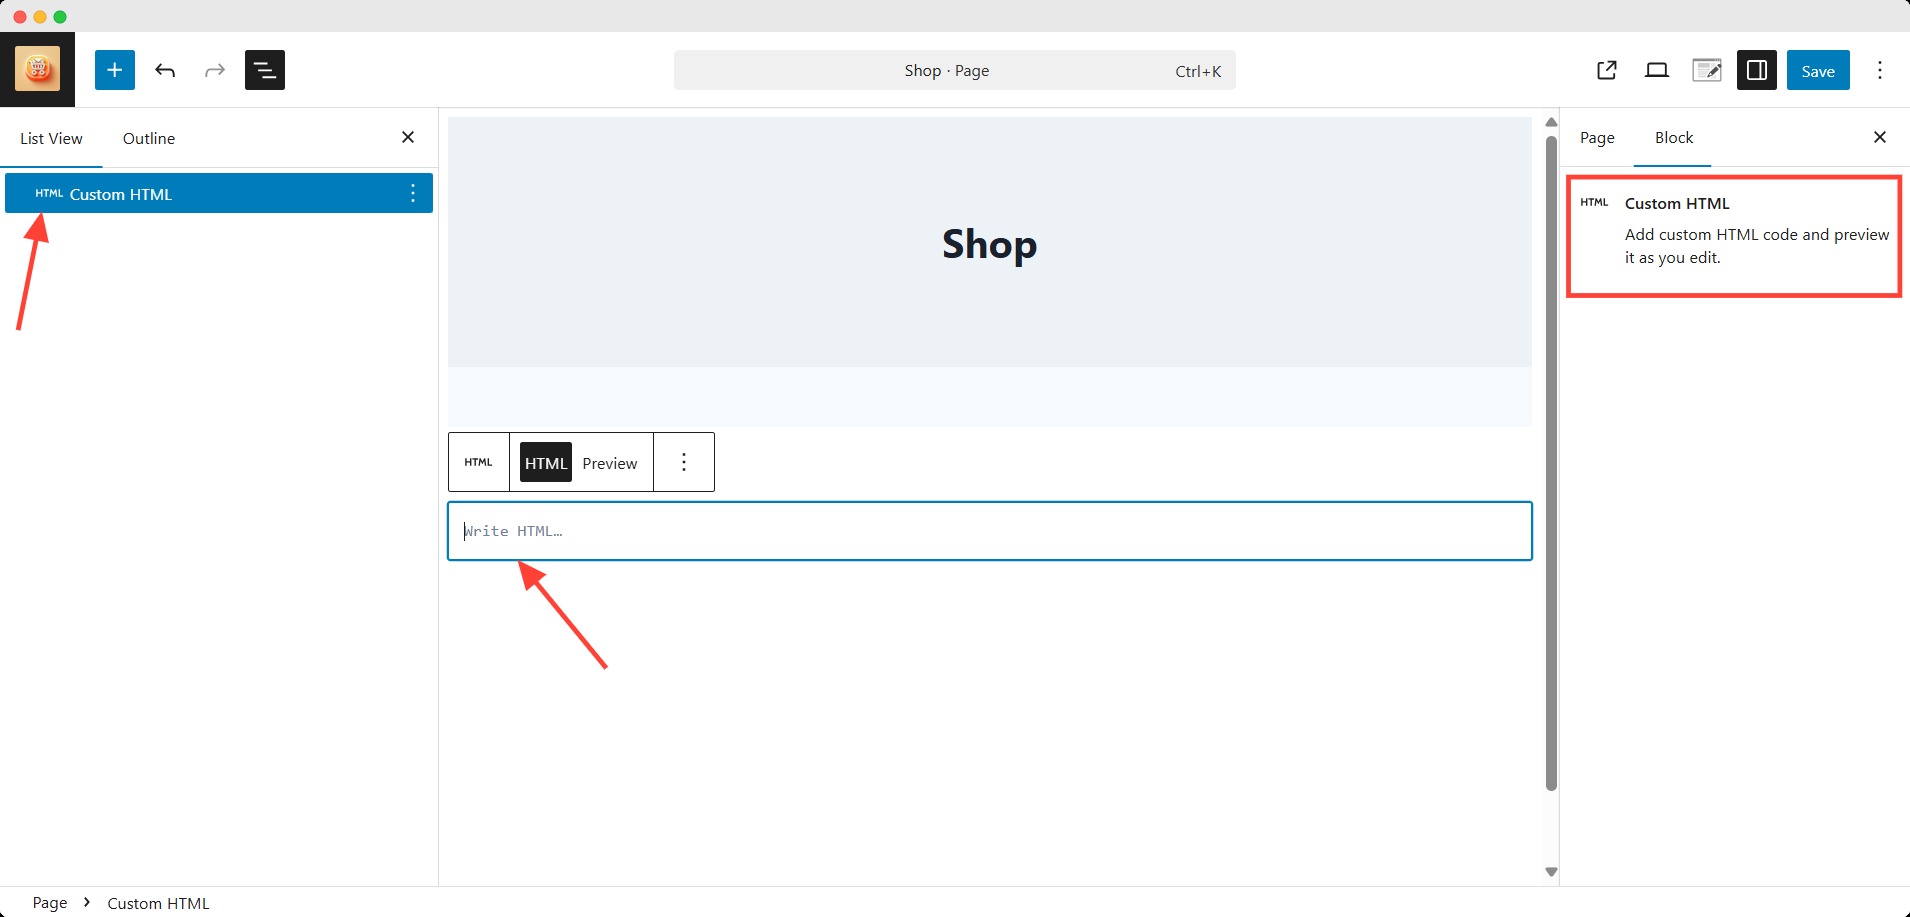
Step 1: Add a Custom HTML Block on Your Desired Page
First, you need to choose on which page you want to show the image as popup. Click the edit button of the page.
Here, you have to add a custom HTML block which will contain the custom code for image popup.
Step 2: Add the Code Snippet in the Custom HTML Block
Now, add the custom code in the block. I have used a simple code snippet for a modal image popup on click.
Before starting the process you need to install and activate the plugin. You can follow the official documentation for the installation process.
Once activated, you can start with the following step.
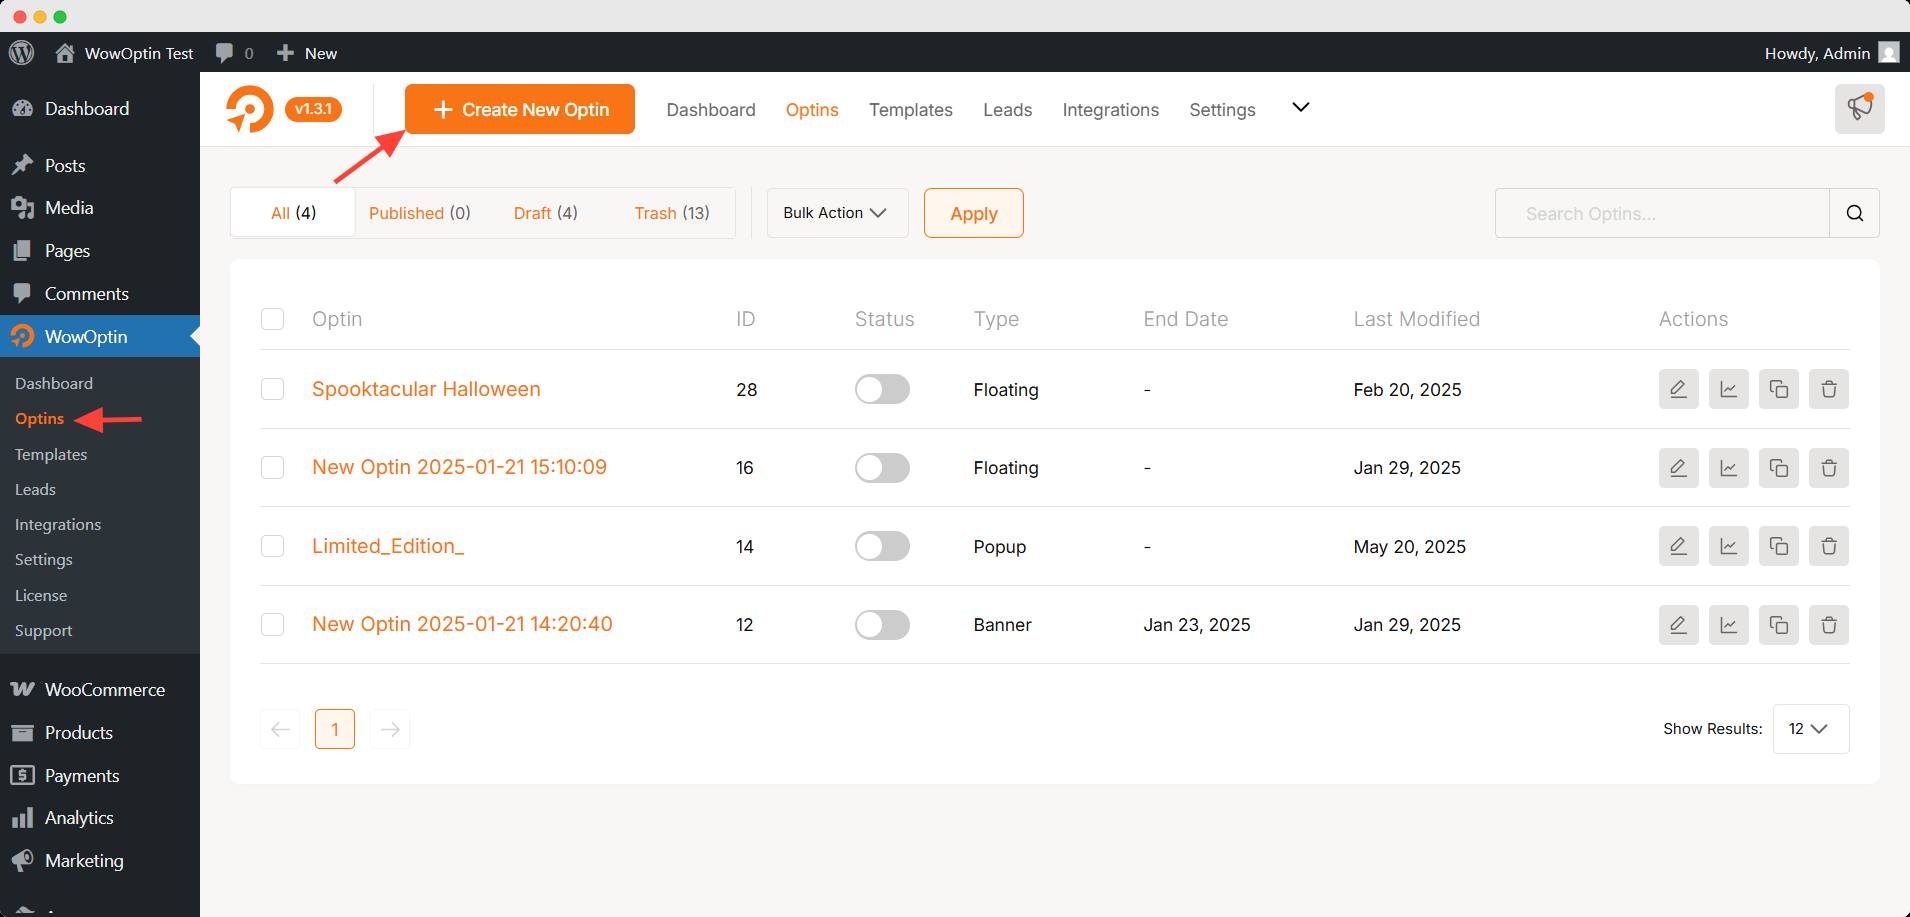
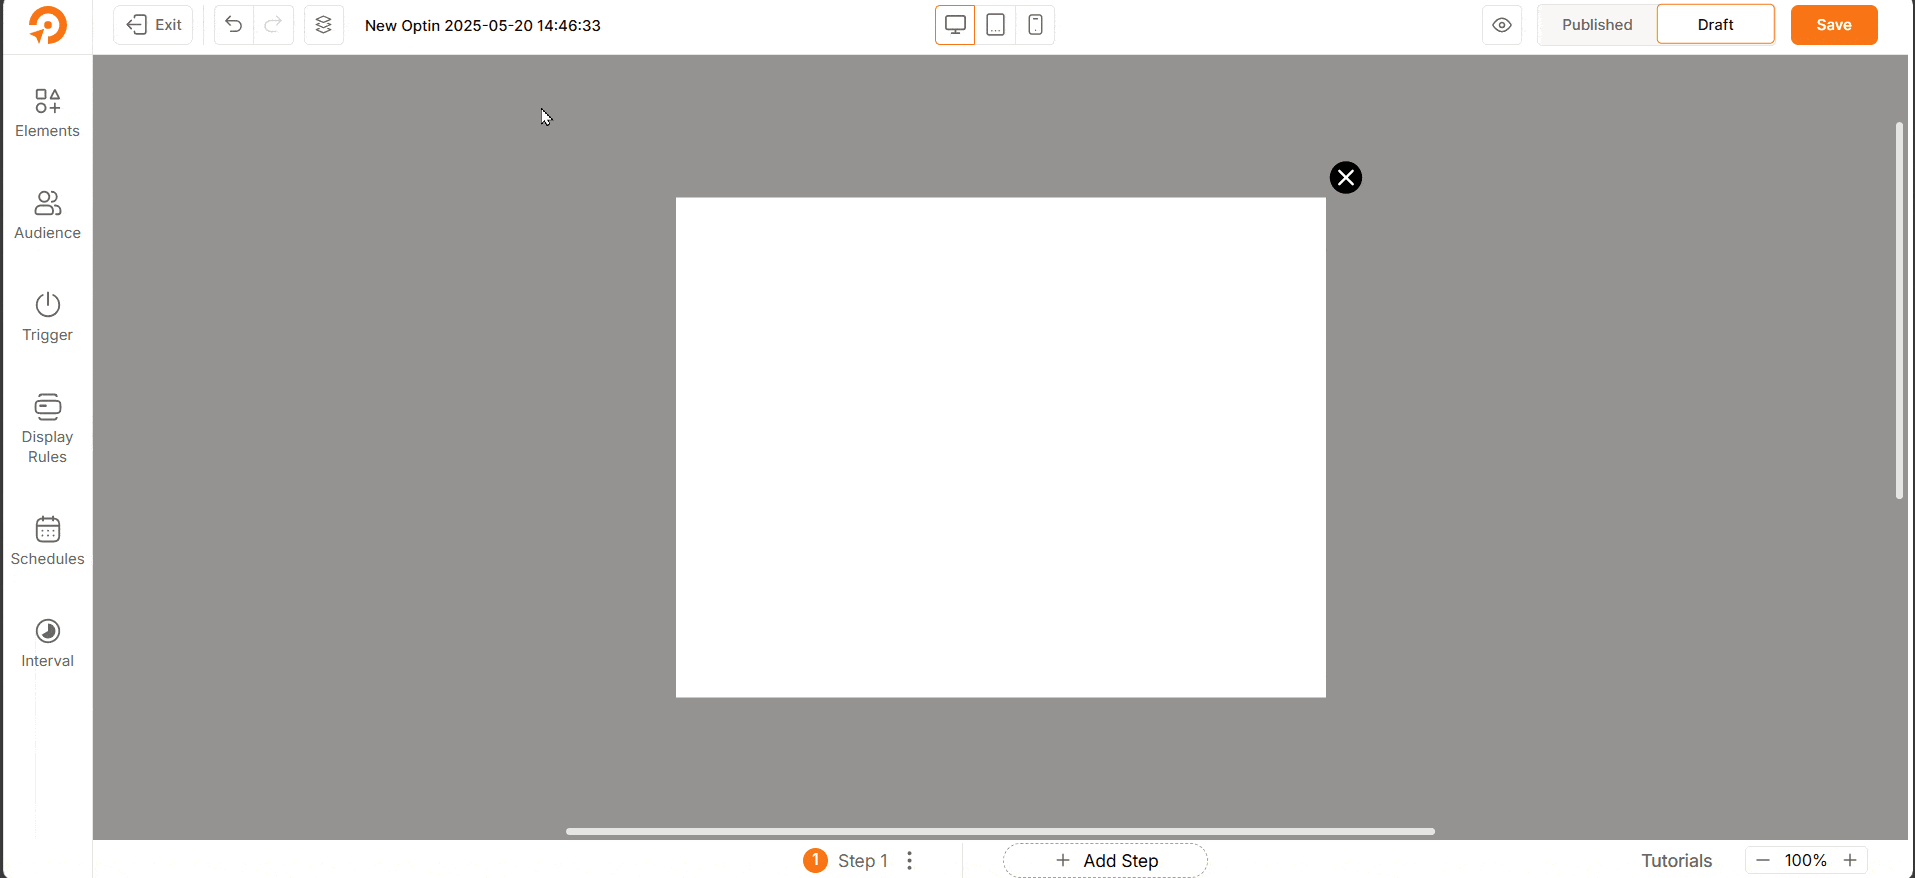
Step 1: Select the Popup Optin
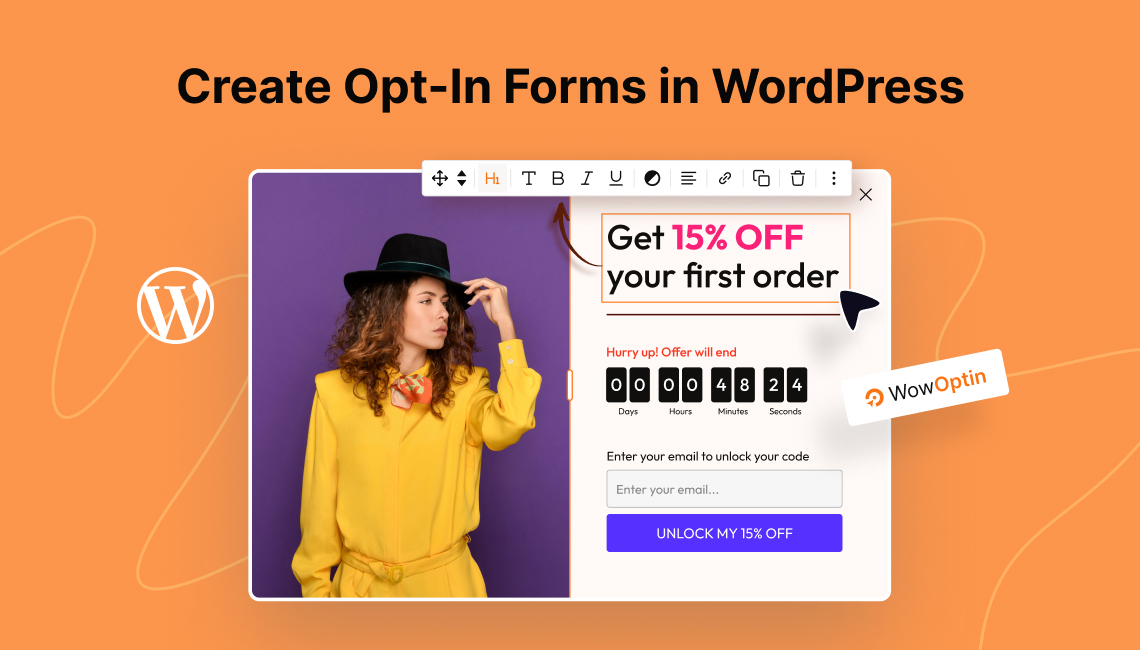
First, you have to create a new optin. To do that go to WowOptin >> Optin from your WordPress dashboard. Then click the Create New Optin button.
It will take you to the template tab, where you can choose from more than 200 templates of different types of optins.
Click Start from Scratch and select the Popup to start with. It will take you to the optin builder interface, where you can start designing the popup.
Pro Tips You can go directly the template menu of WowOption to reduce the journey. You can filter out the premade templates to choose a suitable template. Otherwise starting from scratch would be decent idea.
Step 2: Add an Image Element
Now head over to left sidebar, click the elements tab here. It will expand the options of all the elements available.
Click on the image element, you will find some premade image to choose from. Similar to template you can also choose to upload your own image.
Here, you add the image from your media library of upload a new one from your PC.
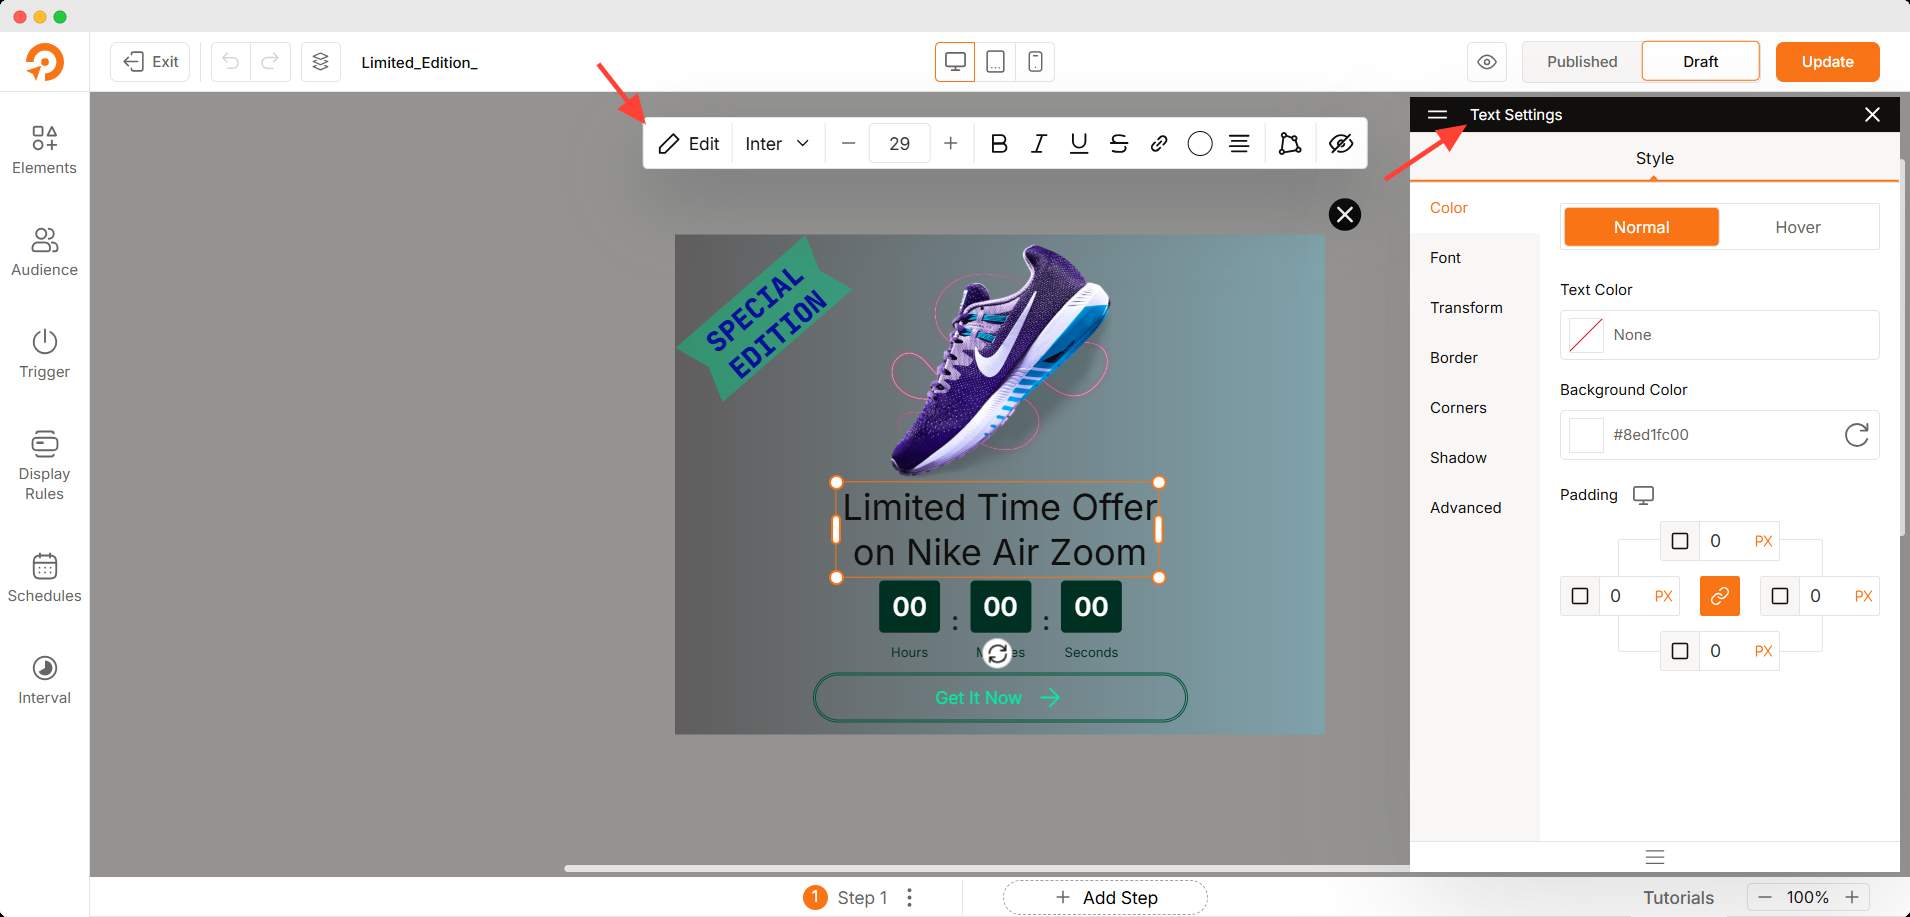
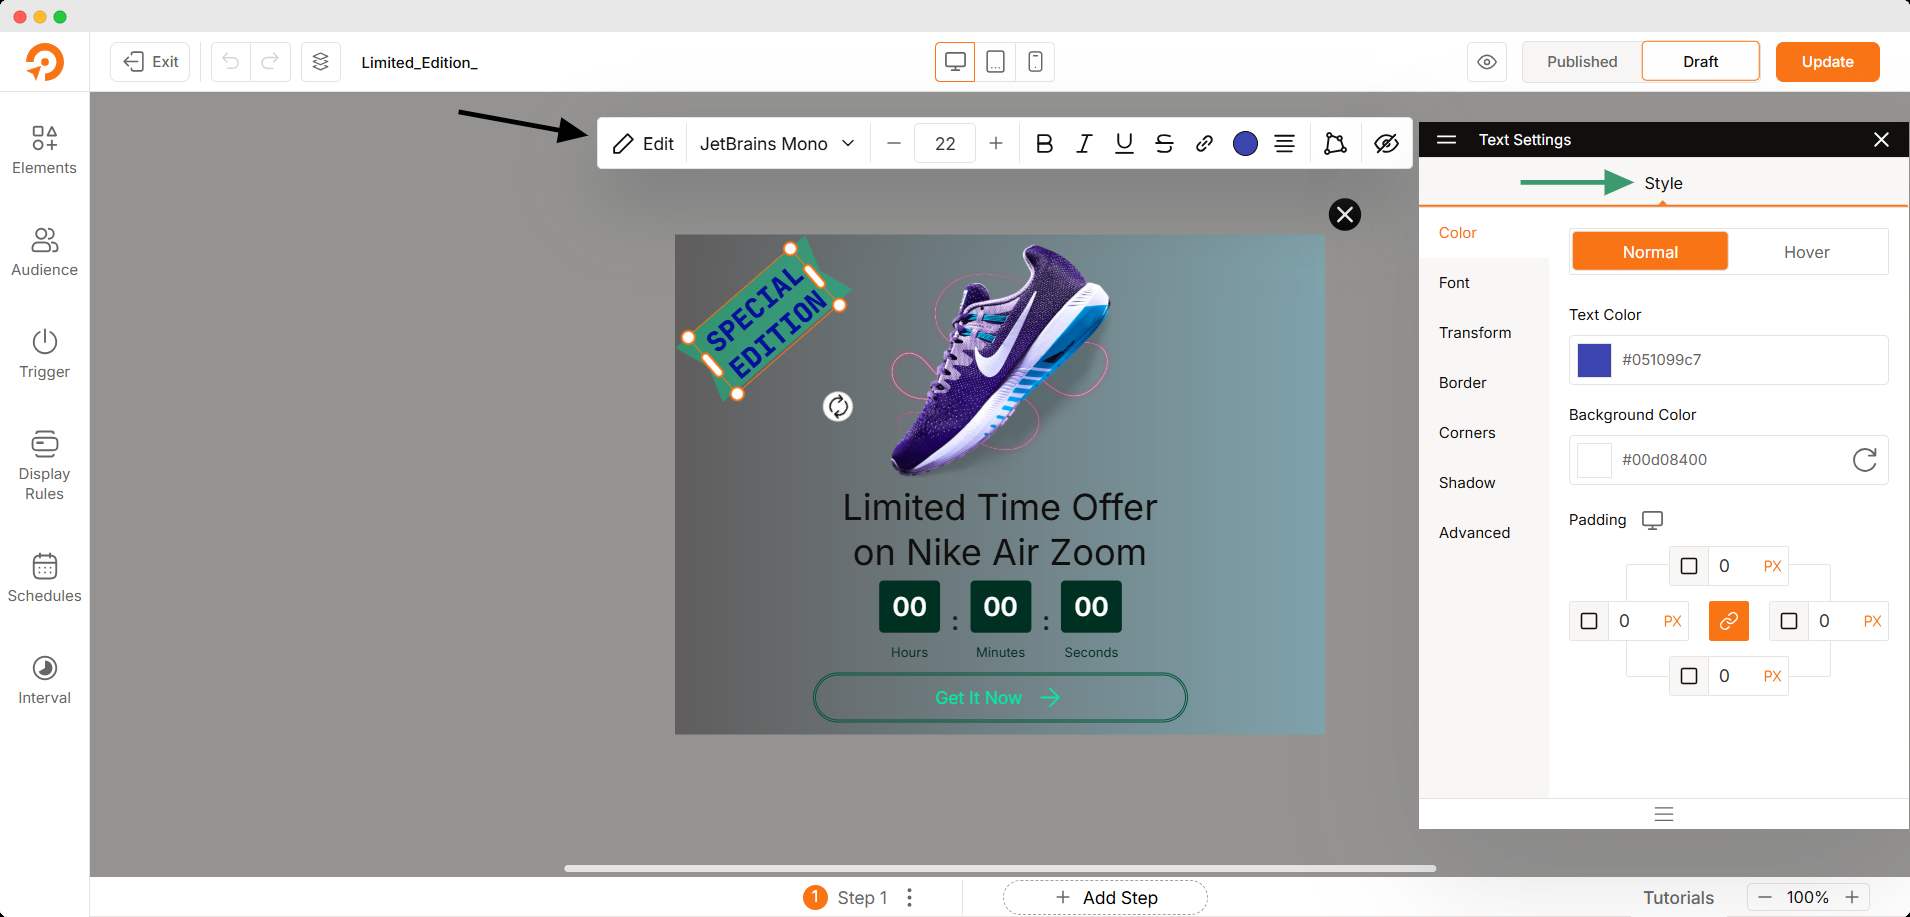
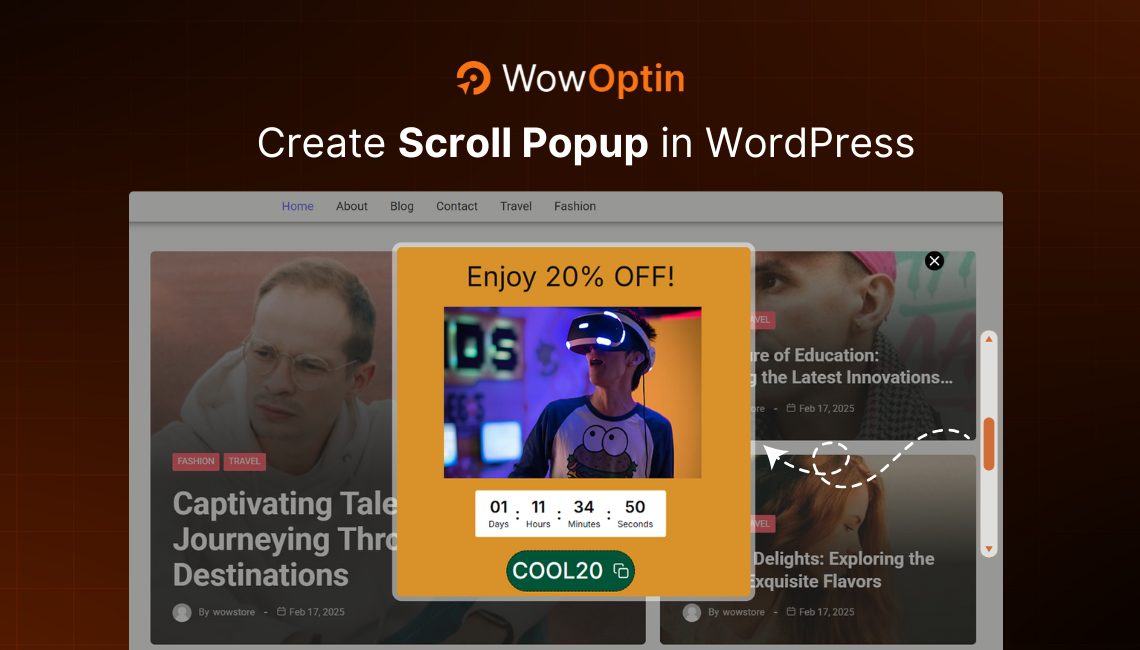
Step 3: Design Your Image Popup
Just adding an image to the popup won’t bring much attention to your use. Let’s see how I designed it. You should explore the options and customize it however you like.
I added elements to make the image popup more engaging. I added a Text element to input my text and dragged it to a suitable place. I can change typography, color, etc basic settings from the bar above.
Similarly, I added shape, countdown, and button to organize my desired popup image. Feel free to customize every element from the bar above. I chose my desired shape and changed it in the shape color setting.
You should explore countdown and button settings from their functions above. From there, you can change as you like.
Pro Tips Don’t forget to check the popup’s responsiveness by using the device option in the bar above. Also, use the live preview button to ensure it looks great all together. If needed, you can rearrange the popup by dragging the element to your preferred position.
Once the design is final, let’s move on to target the right audience.
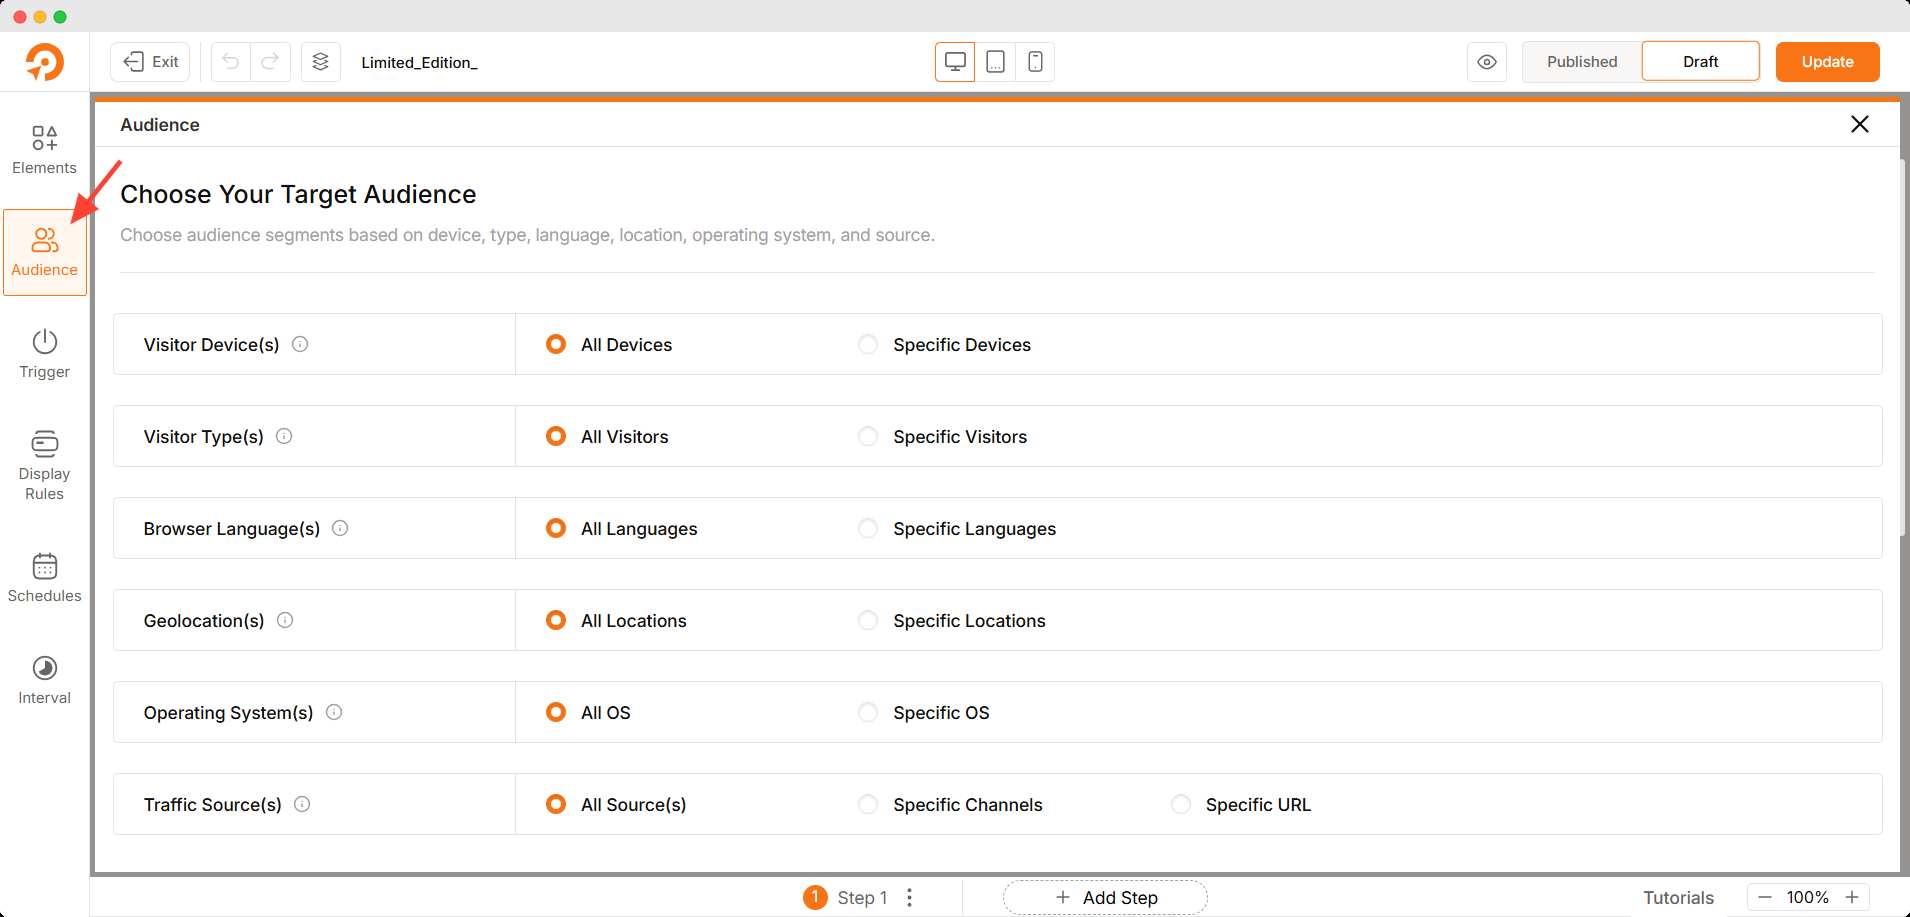
Step 4: Choose Your Popup’s Target Audience
WowOptin lets you choose yourTarget Audience. It diversifies your users based on their key characteristics and sources. Targeting a specific audience maximizes the possibility of conversion rate.
I can choose based on devices, visitor type, language, geography, etc. You can even change OS preferences and traffic sources.
Step 5: Setting Trigger Behavior of the Popup
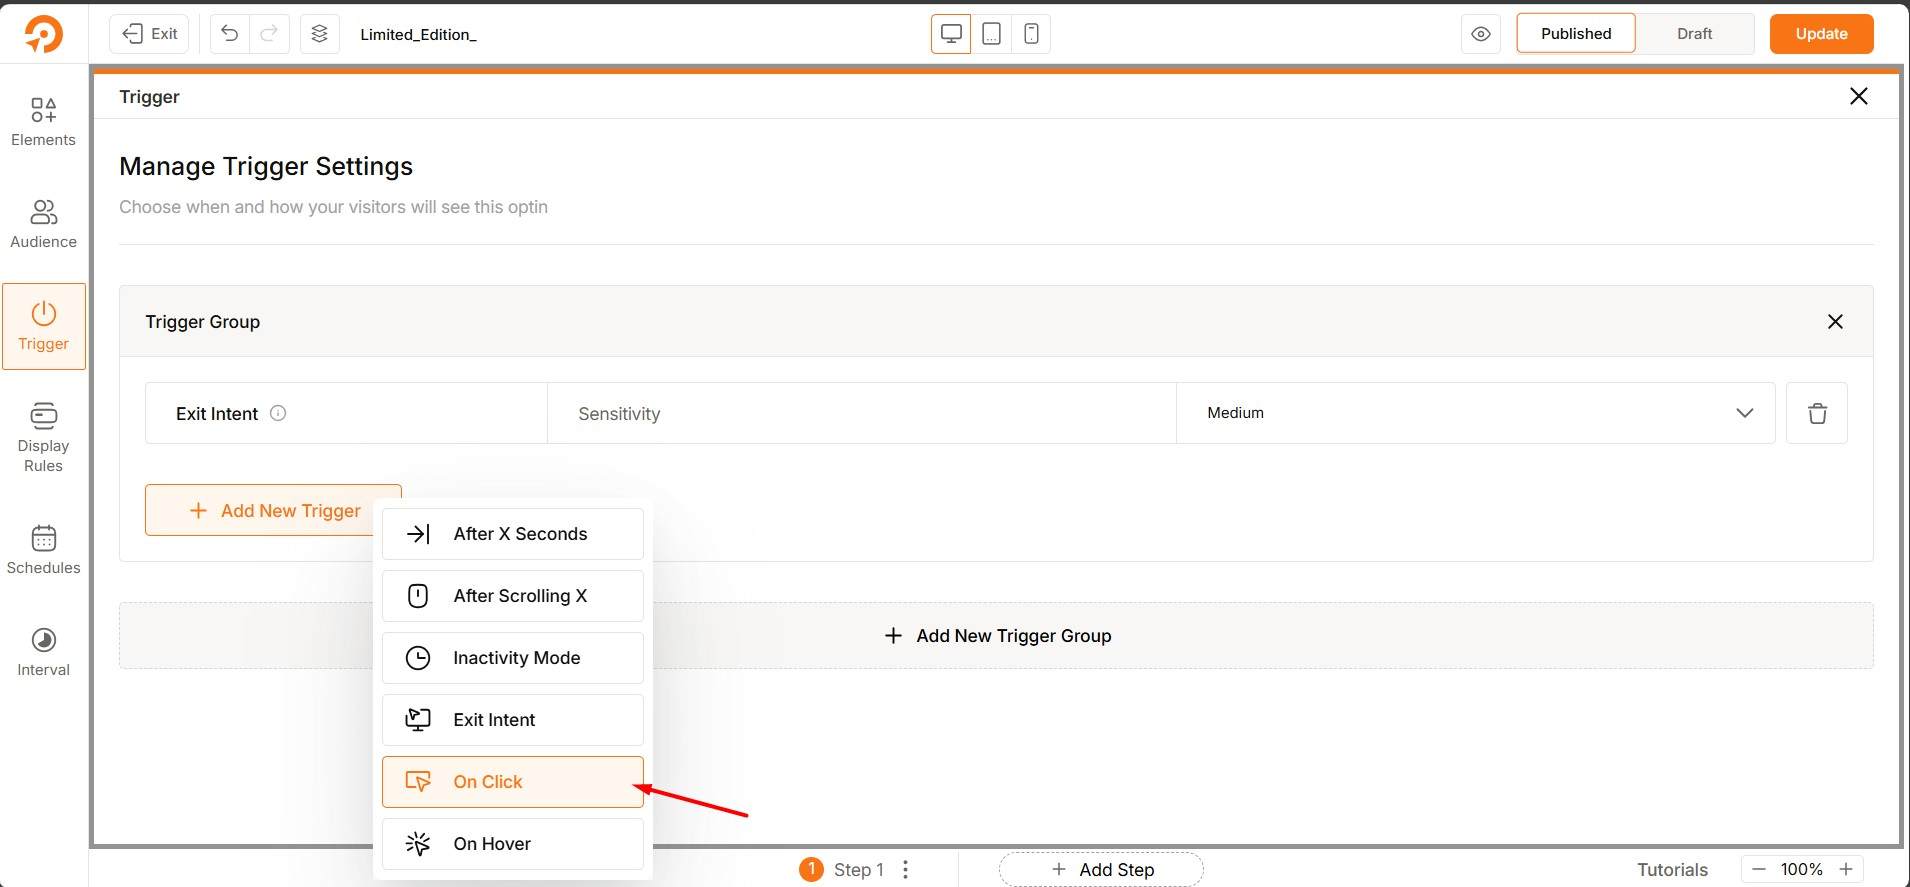
The Trigger option decides what behavior led your image popup to appear. It means any specific user behavior will display the popup. It helps to enhance the visitors’ experience for your site.
Here, I selected Exit Intentwhich will take effect if the user intends to leave the page. The sensitivity indicates how quickly the popup will appear based on cursor movement.
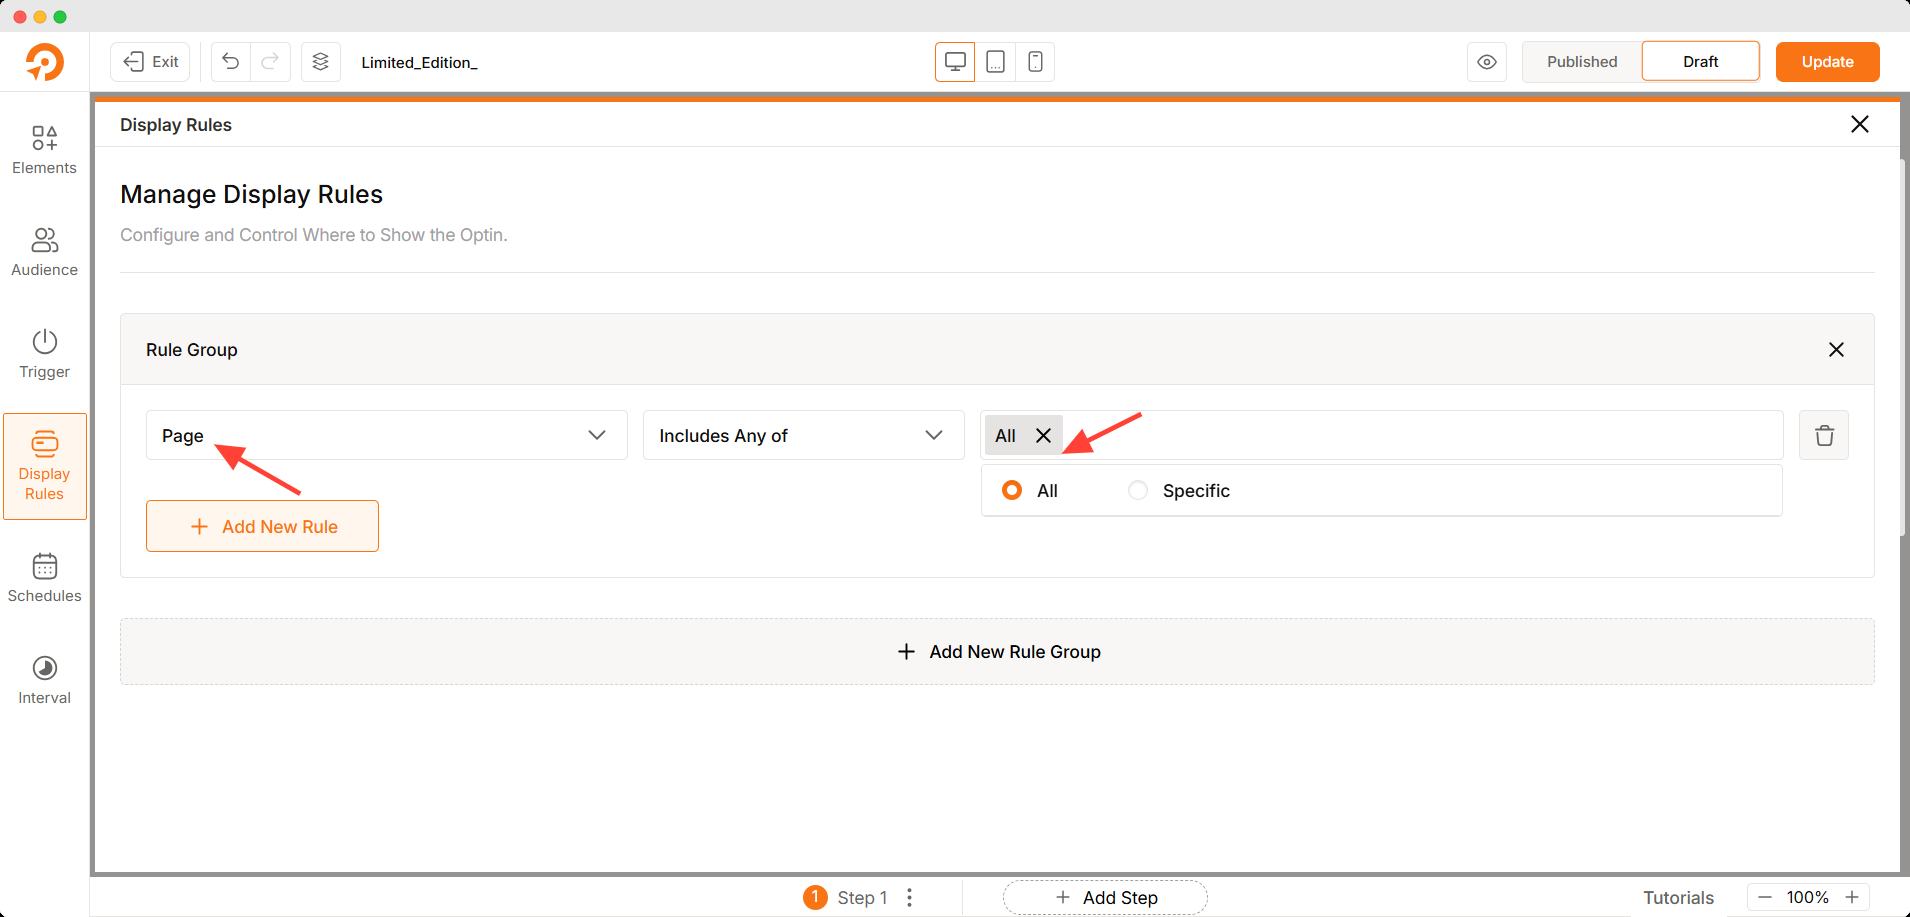
Step 6: Defining Display Rules for the Popup
In WowOptin you can select the pages you want to display the image popup. Display rule helps you utilize tailored popup interactions for each page.
Here, I selected all pages to display the pop-up. You can set your display rule based on your preference.
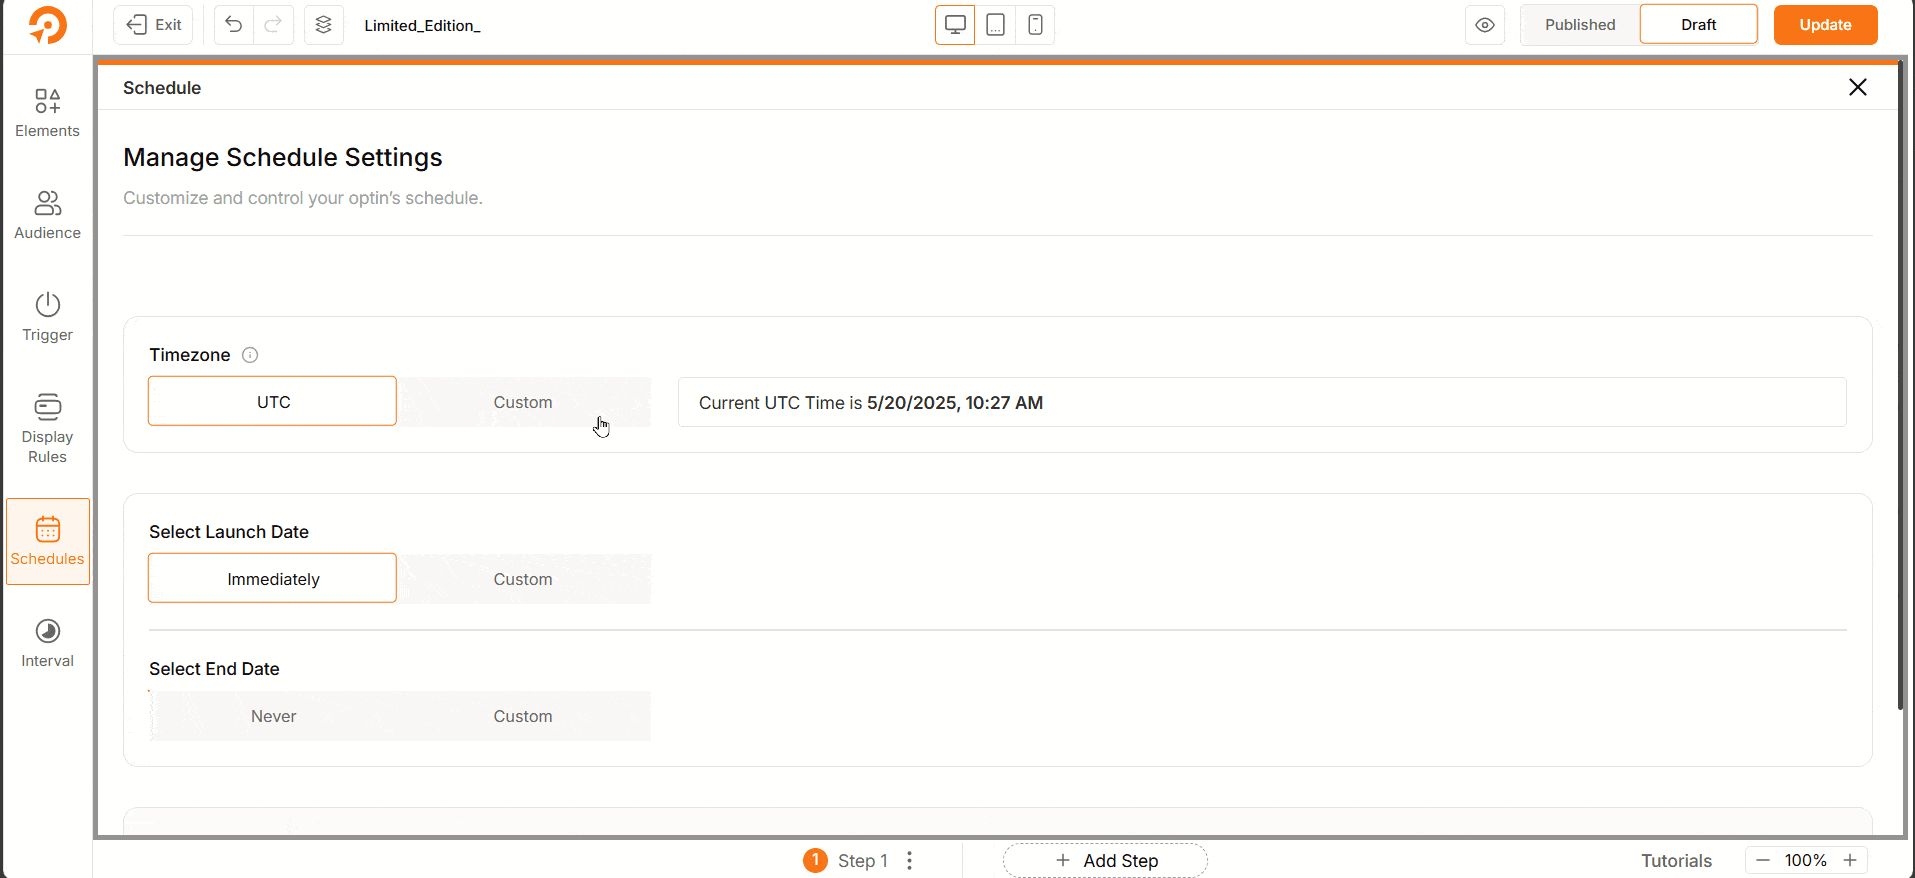
You can select a suitable schedule for your image popup to display. This feature helps you to manage multiple campaigns or offers easily.
You can also select the recurring schedule.
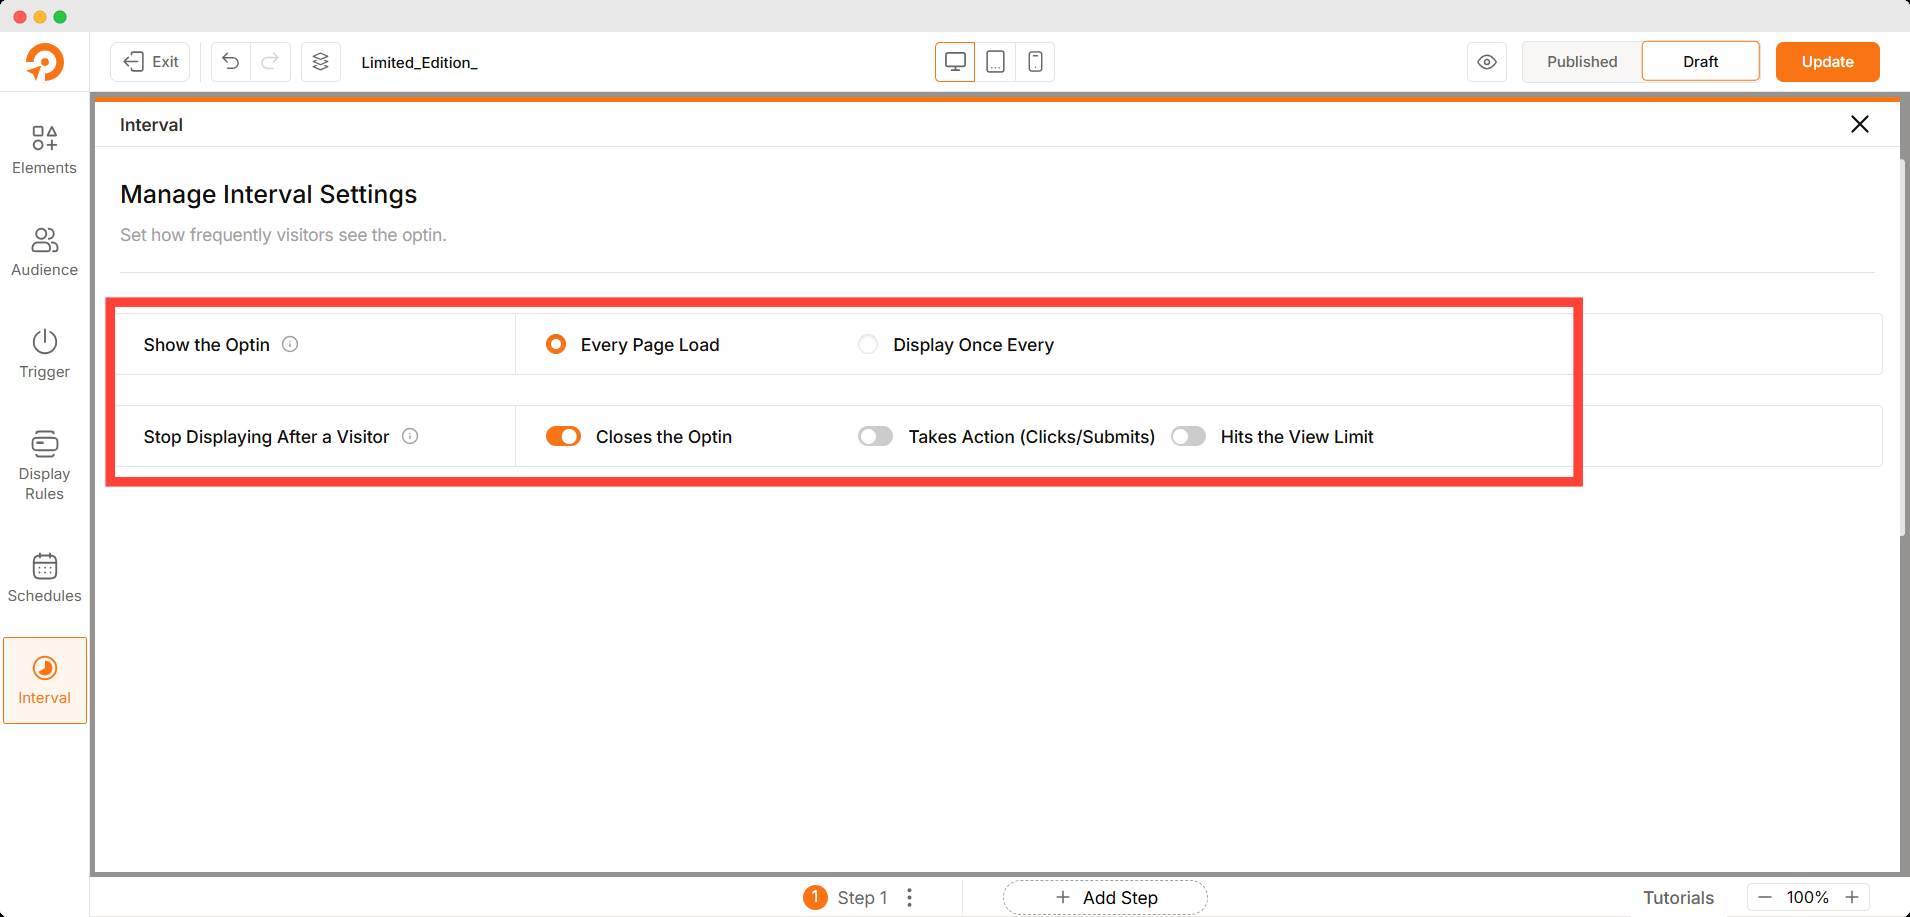
The Interval setting will control the display frequency and closing behavior of the popup. It helps you optimize visitors’ experience.
After finishing up, save/update the popup. Now you should check the frontend page and observe your image popup.
Let’s see how my popup works on the live page.
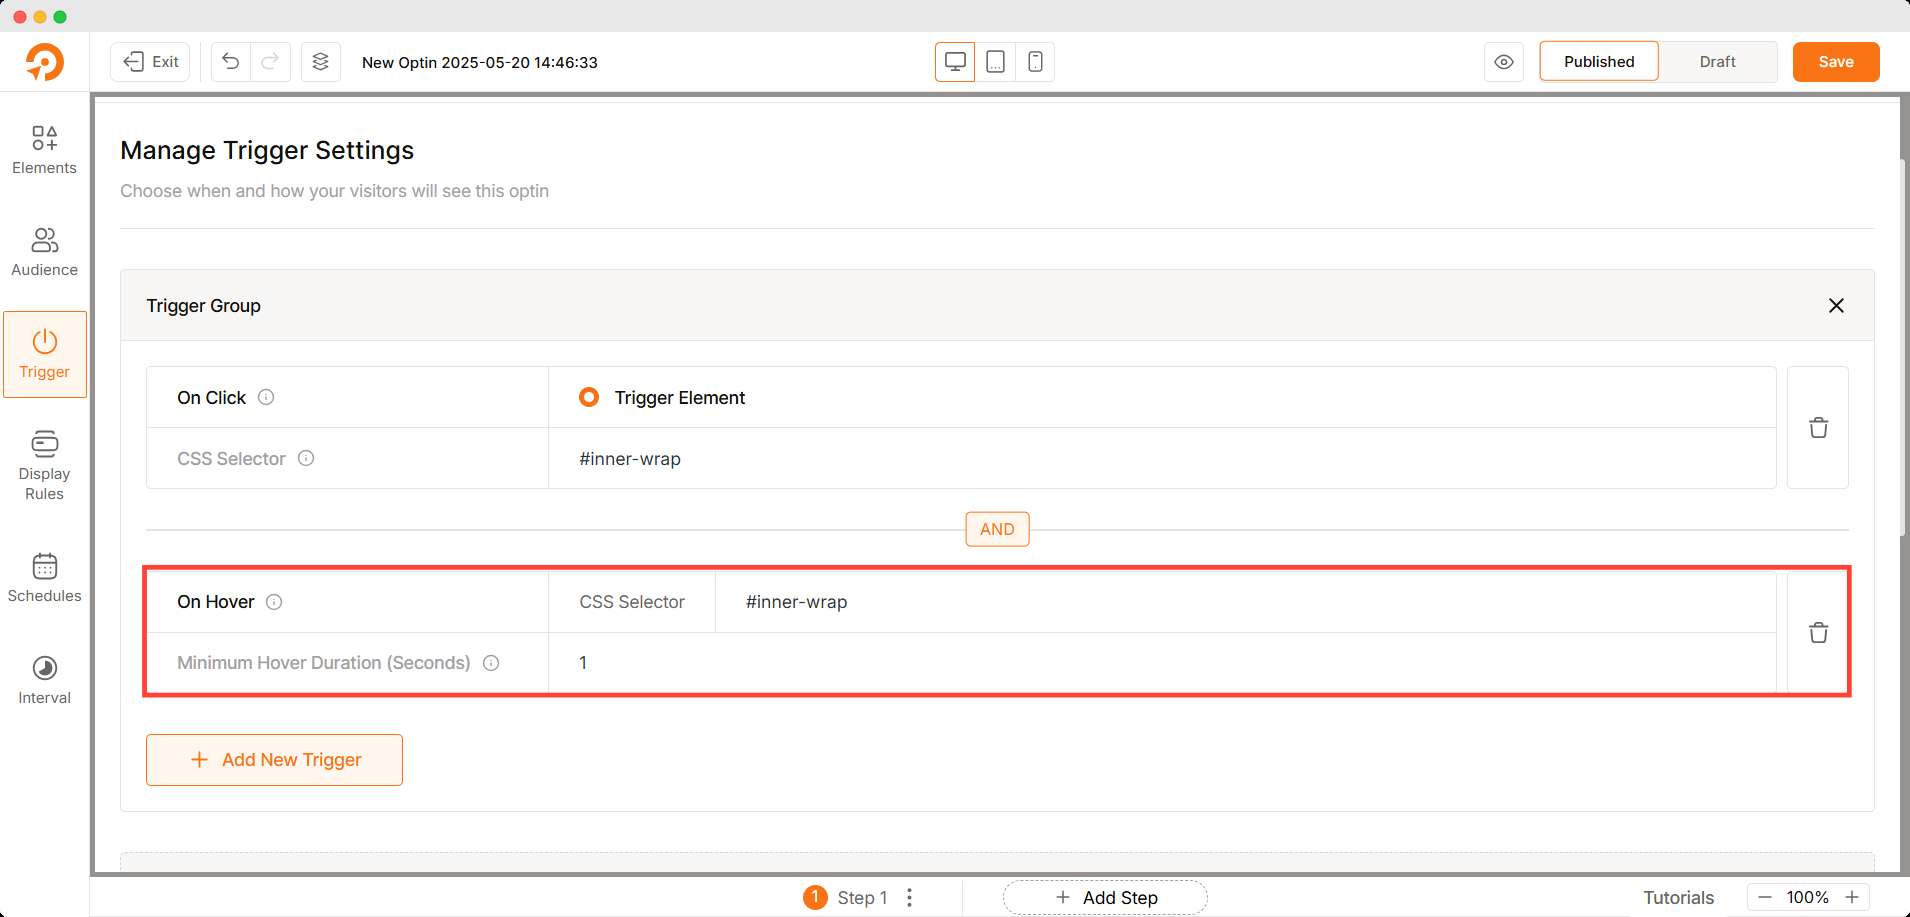
How to Trigger Image Popup on Click or Hover
To trigger any popup on click you need to change the trigger setting. We can change the exit intent trigert to on click here, too.
Go to the trigger setting of the optin and click the add new trigger button. Here, choose the On Click option.
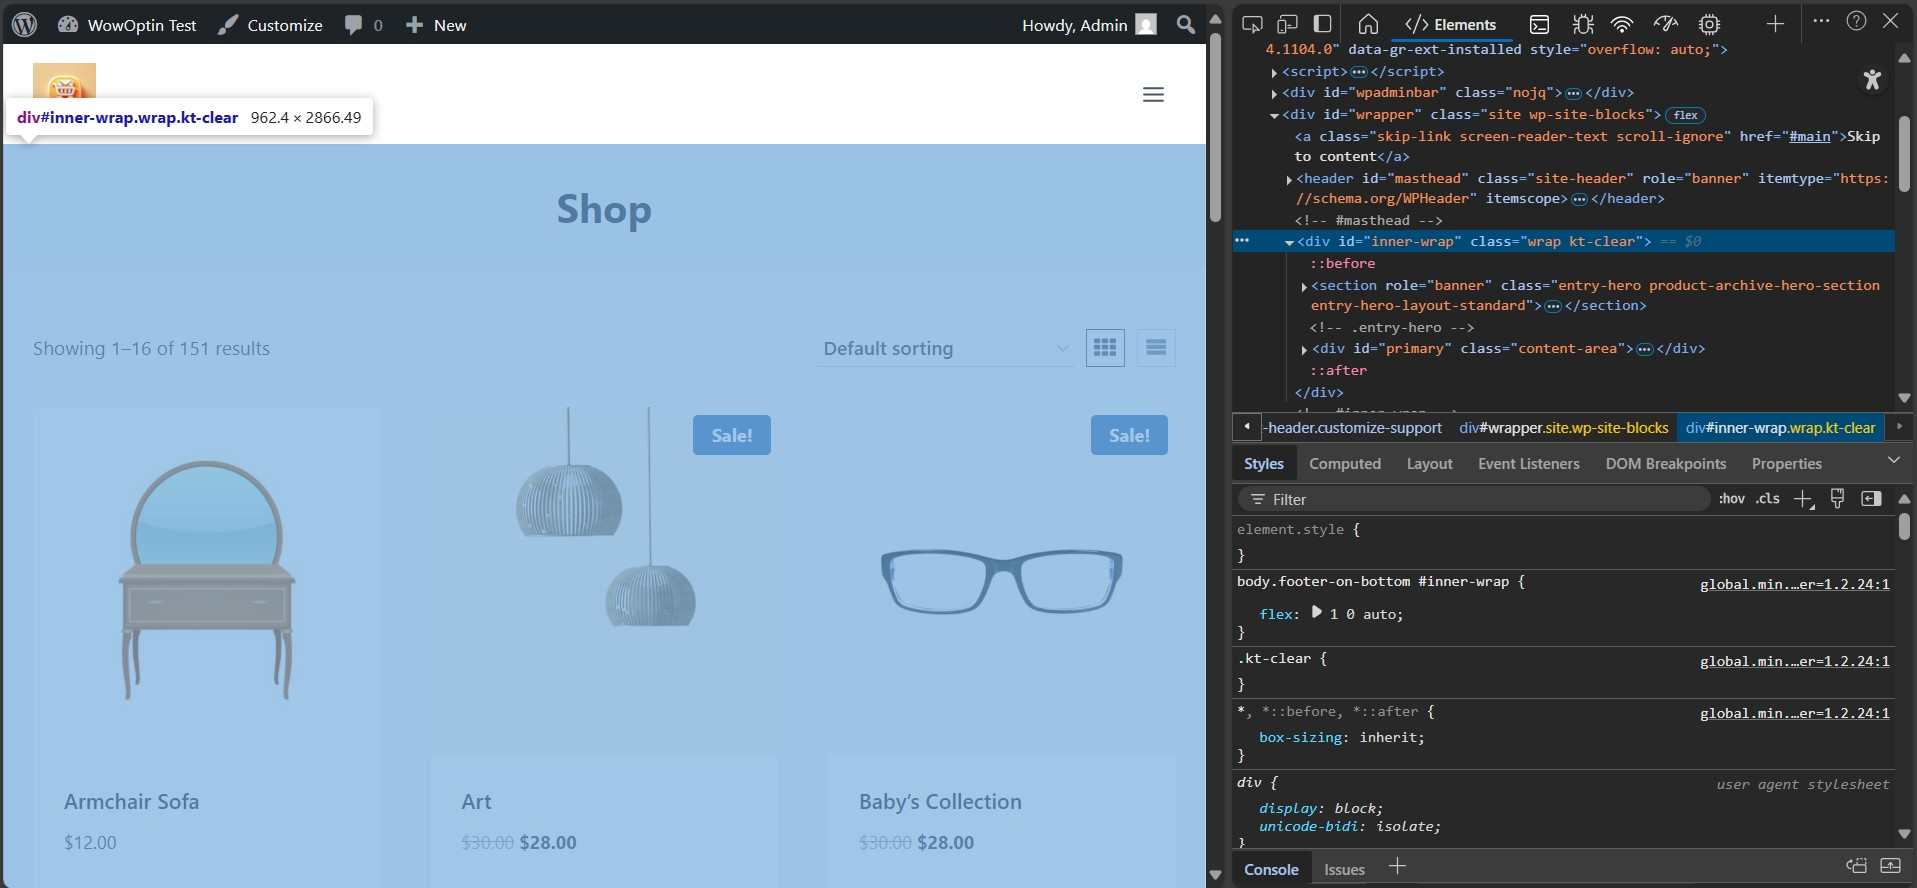
Now, you have to choose the area where the user’s click will trigger this popup. Add the CSS selector for that area of your website.
To get the class of your preferred area, go to the inspect version (ctrl+shift+c) of your site. Then click a area on your page and it will highlight particular HTML code for that area.
Copy the id/class/tag from code and paste it to the CSS selector field in trigger setting. Then, hit the update button to save the changes.
On the other hand, you can use On Hover trigger too. Simply choose On Hover option for trigger and add the CSS selector in the same way before.
Additionally, we have to set the Minimum Hover Duration here. It will display the popup after the given amount of seconds in the respective field.
Pro Tips You may delete the previous trigger settings otherwise two different trigger might conflict while functioning.
Why I Chose WowOptin: Quick Plugin Comparison
As I said, there are lots of alternative of WowOptin in WordPress, you might wonder why I went for it; which is comparatively newer plugin in this feature.
After using some other plugins for image popup and comparing what WowOptin offers me, I have made my decision.
Here’s a quick comparison table that will help you understand.
Want your popup to actually work? Here’s what you should keep in mind:
Start with a clear goal: Are you trying to share info, promote an offer, collect leads, or boost engagement? Define the purpose first — design comes after.
Design with purpose: Need signups? Add a form. Want clicks? Include a button. Just showcasing an offer? A bold image will do the job.
Use contextual visuals: Images that connect with the content or audience drive more engagement and conversions. Avoid random stock photos.
Keep it clean and focused: A cluttered popup turns users off. Instead, guide their attention with one strong image and a simple message or action.
Balance beauty and performance: A well placed popup can improve your page’s visual appeal and user experience. Use your tools smartly — not forcefully.
Check out WowOptin’s capabilities at a glance in this video:
Final Thoughts
Adding an image popup isn’t just a visual boost, it can directly impact your conversion rate and overall profit margin. A well-timed, well-designed popup grabs attention and encourages action.
Since implementing WowOptin, many users have seen higher engagement, better impressions, and even increased sales — all without overcomplicating the process. Its modern yet minimal interface makes it easy to create popups that actually work.
Got stuck or have feedback? Drop your thoughts in the comments — I’d love to hear them. And if you need help fine-tuning your popup strategy, don’t hesitate to reach out to the WowOptin support team — they’re quick and helpful.
Image popups don’t affect your SEO directly. However, image loading, responsiveness, and behavior can impact your site authority. Also if there are any fishy activities linked to your popup, it might send the wrong signal to the search engine. Monitor & track the optin performance through WowOptin to get ahead of such activity.
Can You Hide Popup Images on Mobile?
Yes, you can hide popup images on mobile by using WowOptin. Select the image element on the optin builder and click the hide-in device function on the setting bar. A popup will appear, letting you decide on which devices you want to hide the image. Toggle the mobile option and it won’t show on any mobile.
Which Image Format is Suitable For Popup?
You can use any type of image in the popup considering the size of it optimized. However, WebP images are suitable for quick loading quickly which incentivizes users’ experience.
Can You Collect Contact Information From a Popup?
Yes, you can collect contact information through an interactive WowOptin popup. Use the Form element of WowOptin and it will increase your lead collection efficiently.
Arefin is a passionate writer with over three years of experience exploring the world of WordPress and WooCommerce. He loves diving into themes, plugins, and tools, sharing insights that help users build and optimize their websites with ease. When he's not writing, you’ll find him testing the latest tech to uncover game-changing features for online businesses.