Multi-Step Popups are pop-up windows that show information or questions in small steps, one after another. Instead of asking the user to do everything on one big screen, the popup breaks it into simple parts. For example:
- Step 1: The popup asks, “Do you want a discount?” with a Yes button.
- Step 2: If the user clicks Yes, the next popup asks them to enter their email address.
- Step 3: After entering the email, a final popup confirms that the coupon code has been sent.
By breaking the process into simple steps, users don’t feel overwhelmed and are more likely to complete the action.
How to Build a Multi-Step Popup in WowOptin
Follow this step-by-step process to design, configure, and manage multi-step popups inside the WowOptin Builder. For example, you can first capture interest with a discount offer, then collect an email, and finally display the coupon code.
Step 1: Design Your First Popup (Default Step)
Every new popup or optin you create in WowOptin starts as Step 1 by default. This is your starting point, where you set up the main offer or message that captures the user’s attention. Start by designing your first popup screen.
Note: You can quickly get started with a premade multi-step popup. In the WowOptin Templates library (with over 700+ options), set the Number of Steps filter to Multiple Steps. This will show you ready-made multi-step optins that you can use right away.
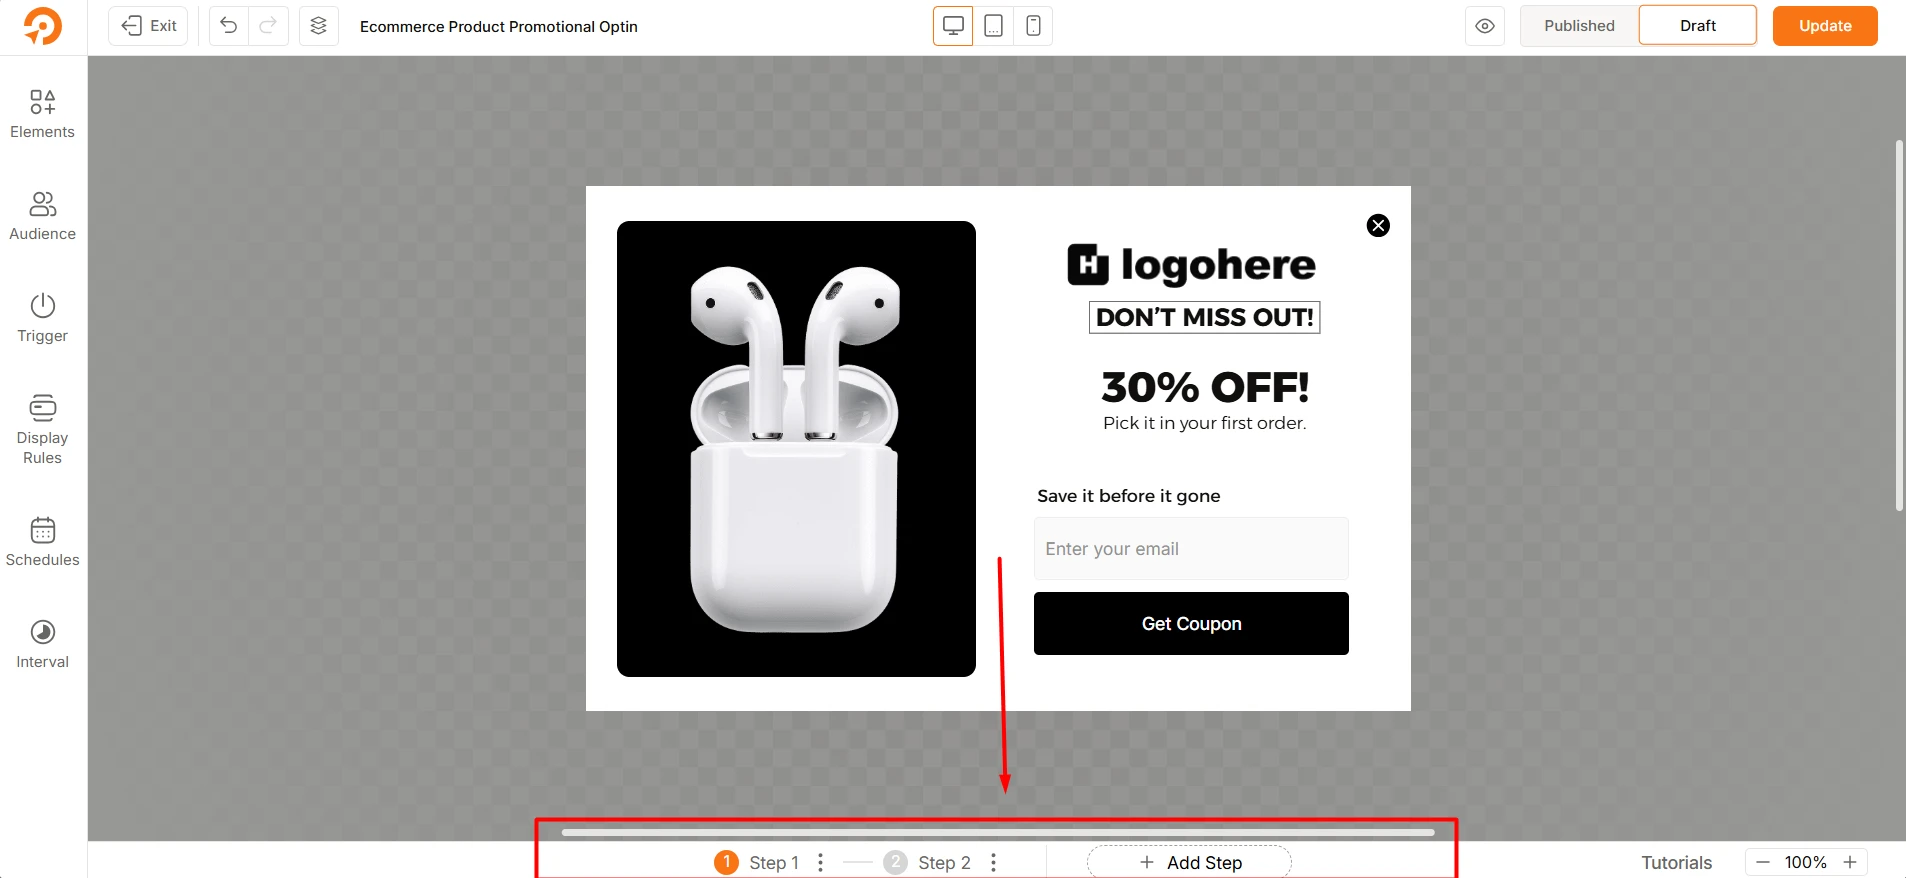
- Example: A promotional message such as “30% OFF – Don’t Miss Out!”.
- Add an input field where the user can enter their email address.
- At the bottom of the editor, you’ll see it labeled as Step 1.
Step 2: Configure Navigation to the Next Step
To move users from the first popup to the next one, you need to configure the button settings in WowOptin. Navigation between steps always happens through a button click.
- For a Button Element, open the Button Action dropdown and select Show Next Step
- For a Form Submission Button, use Action after Successful Submission to define what should happen after the form is completed. Select Show Next Step.
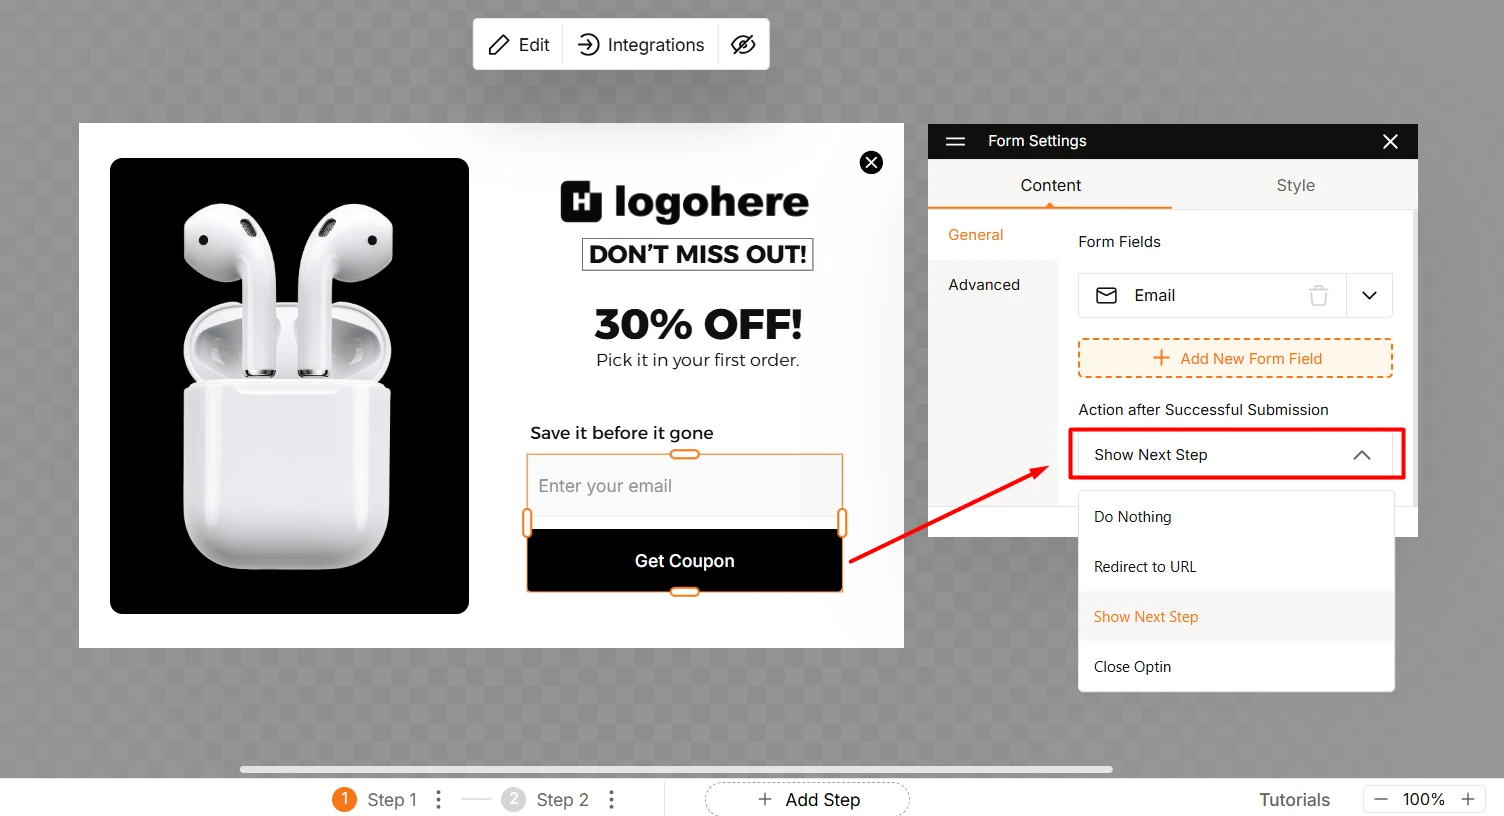
In both cases, Choosing Show Next Step is what creates the multi-step effect, while the other actions give you flexibility for different popup flows. This is the core setting that connects your steps together and makes the multi-step flow possible.
Step 3: Design the Next Step
Once the navigation is set up, you can design the next popup screen. This step will only appear after the user clicks the button or submits the form from Step 1.
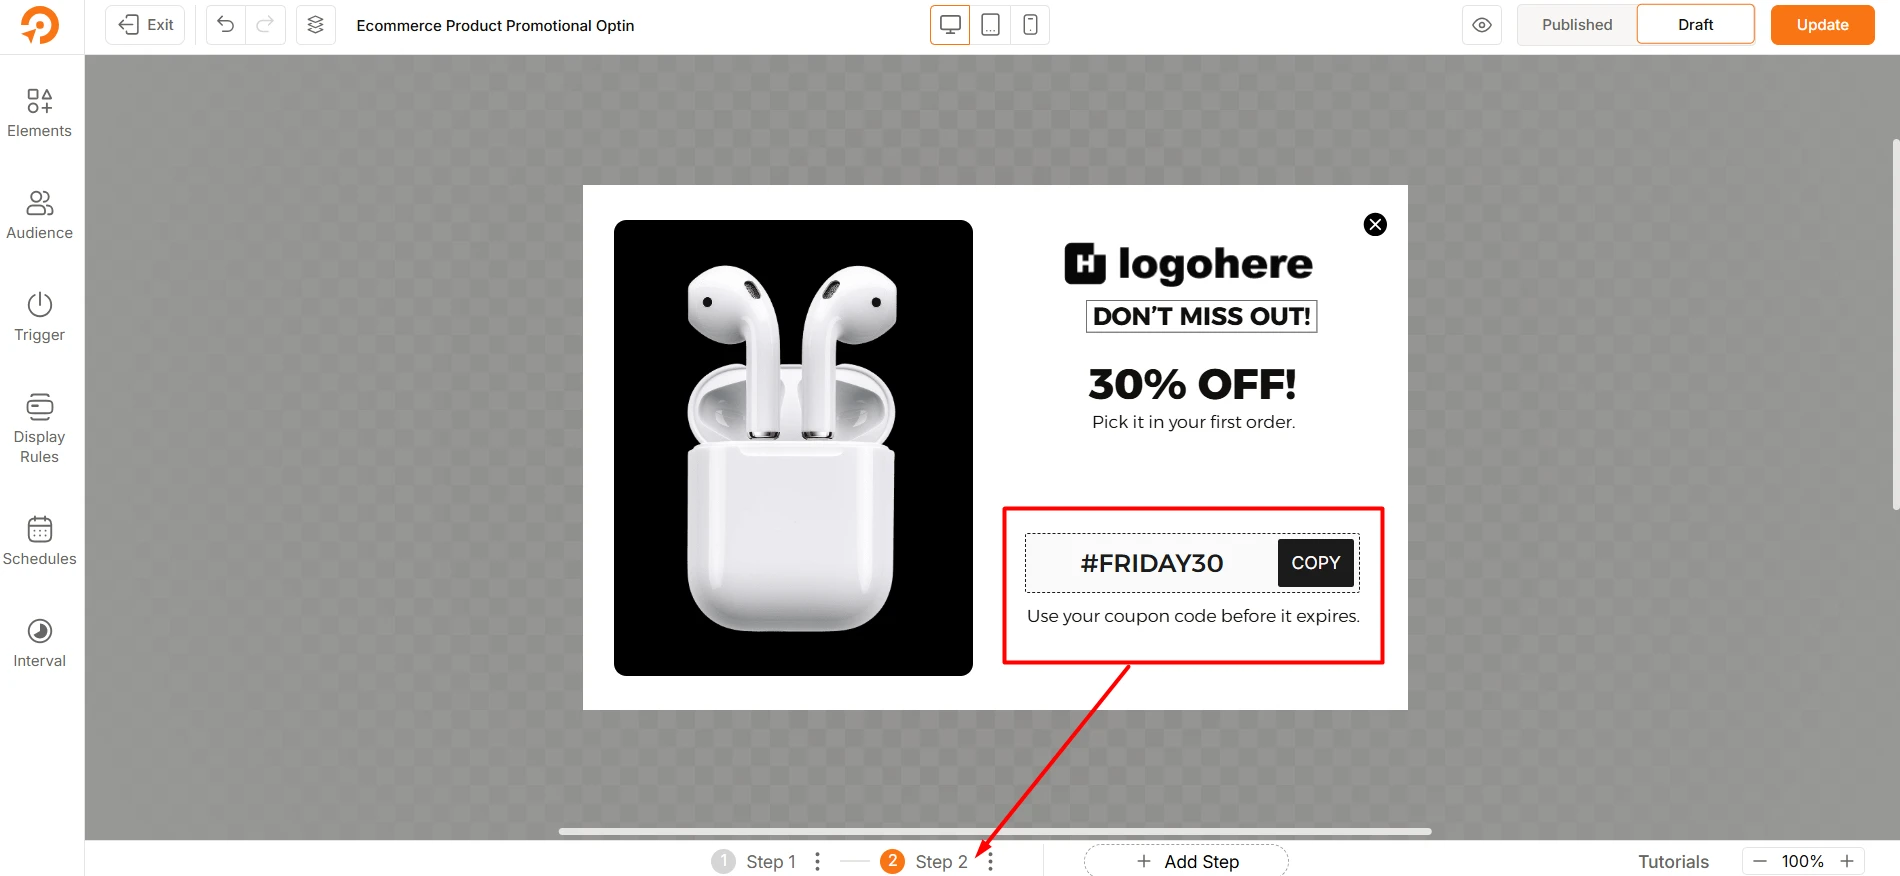
- Click + Add Step at the bottom of the builder to create a new popup screen.
- Customize the content for this step. For example: Show a thank-you message and display a discount code such as “Your code: #FRIDAY30” with a Copy button.
- You can repeat this process to add more steps as needed, creating a complete multi-step flow.
Step 4: Manage Your Steps
All your steps are listed at the bottom of the WowOptin Builder (Step 1, Step 2, Step 3, etc.). From here, you can manage each step:
- Rename a step to keep your workflow organized.
- Duplicate a step if you want to reuse a design quickly.
- Delete a step if it’s no longer needed.
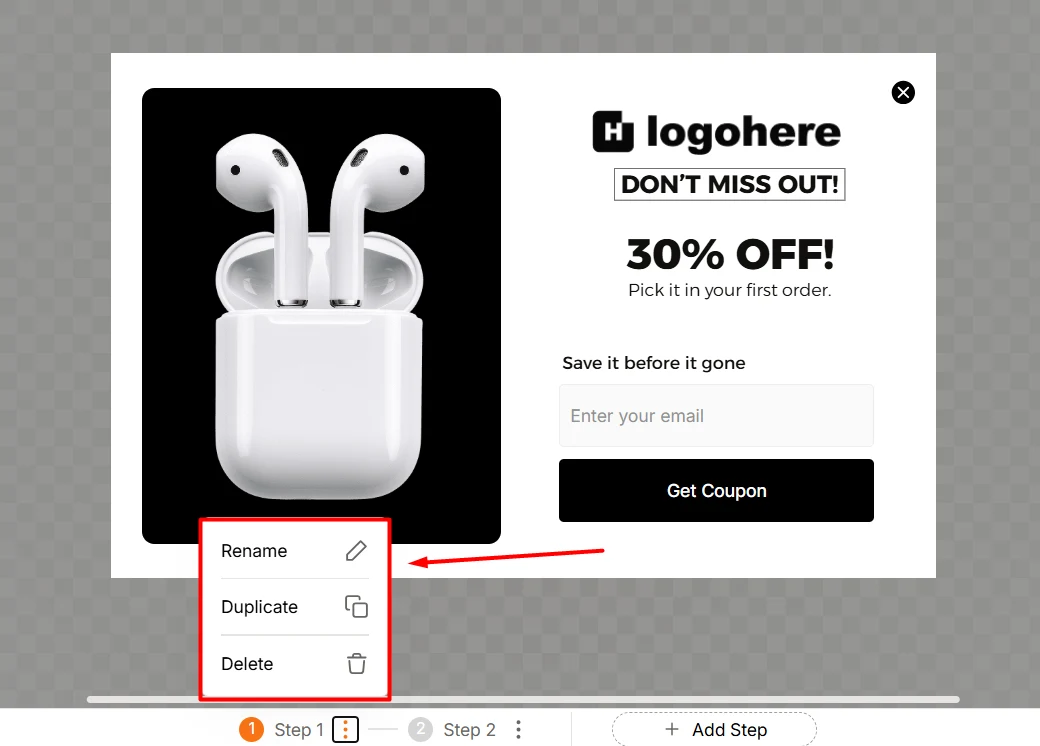
This helps you keep full control of your multi-step popup flow.
✅ With these steps complete, your multi-step popup is ready to go. You can now build engaging flows such as signup forms, discount offers, or onboarding sequences – each broken down into simple, easy-to-follow steps.
Final Notes & Best Practices
When creating Multi-Step Popups with WowOptin, keep these tips in mind to make them as effective as possible:
- Keep each step short and simple – focus on one action per step to avoid overwhelming users.
- Use clear calls-to-action (CTAs) – buttons should clearly explain what happens next (e.g., “Get My Discount”, “Next”, “Confirm”).
- Maintain consistency – design each step with similar colors, fonts, and style so users feel they’re in the same flow.
- Provide value quickly – if you’re offering a coupon or incentive, make sure it appears early in the flow to keep users motivated.
- Test different flows – experiment with the number of steps or wording of CTAs to see what increases conversions. Learn how to A/B test popups in WowOptin.
By following these practices, you can create smooth, engaging multi-step popups to maximize your lead collection efforts.
Frequently Asked Questions (FAQs)
Here are some common questions users might ask after reading it:
Q1. Why should I use a Multi-Step Popup instead of a single-step popup?
Multi-Step Popups reduce overwhelm and increase completion rates. By focusing on one action per step, users are more likely to stay engaged and finish the process, which improves conversions.
Q2. Can I add more than two steps?
Absolutely. You can add as many steps as needed. Each new step can be created by clicking + Add Step at the bottom of the builder.
Q3. How do I connect steps together?
Navigation between steps is controlled by buttons:
For a Button Element, set Button Action → Show Next Step.
For a Form Button, set Action after Successful Submission → Show Next Step.
This is what makes your popup flow multi-step.
Q4. Do I always need to add Step 1 manually?
No. In WowOptin, every new popup or optin you create starts as Step 1 by default. You just need to design the content of that first popup.
Q5. Can I use templates instead of building from scratch?
Yes. WowOptin offers over 700+ templates. In the Templates Library, simply set the Number of Steps filter to Multiple Steps to find ready-made multi-step popups you can customize.