Triggers let you control exactly when and how your optin appears based on user behavior. By combining different trigger types and group logic, you can create highly targeted engagement strategies that maximize conversions.
What Are Trigger Groups in WowOptin?
A Trigger Group is a collection of one or more triggers. All triggers inside a group must be met for an optin to appear. You can create multiple Trigger Groups within a campaign.
Logic Between Trigger Groups
When you have multiple Trigger Groups, they operate using OR logic.
This means that if the conditions in any one group are met, the optin will appear, even if the conditions in other groups are not met.
Let’s break it down with an example:
Imagine you’ve created two Trigger Groups:
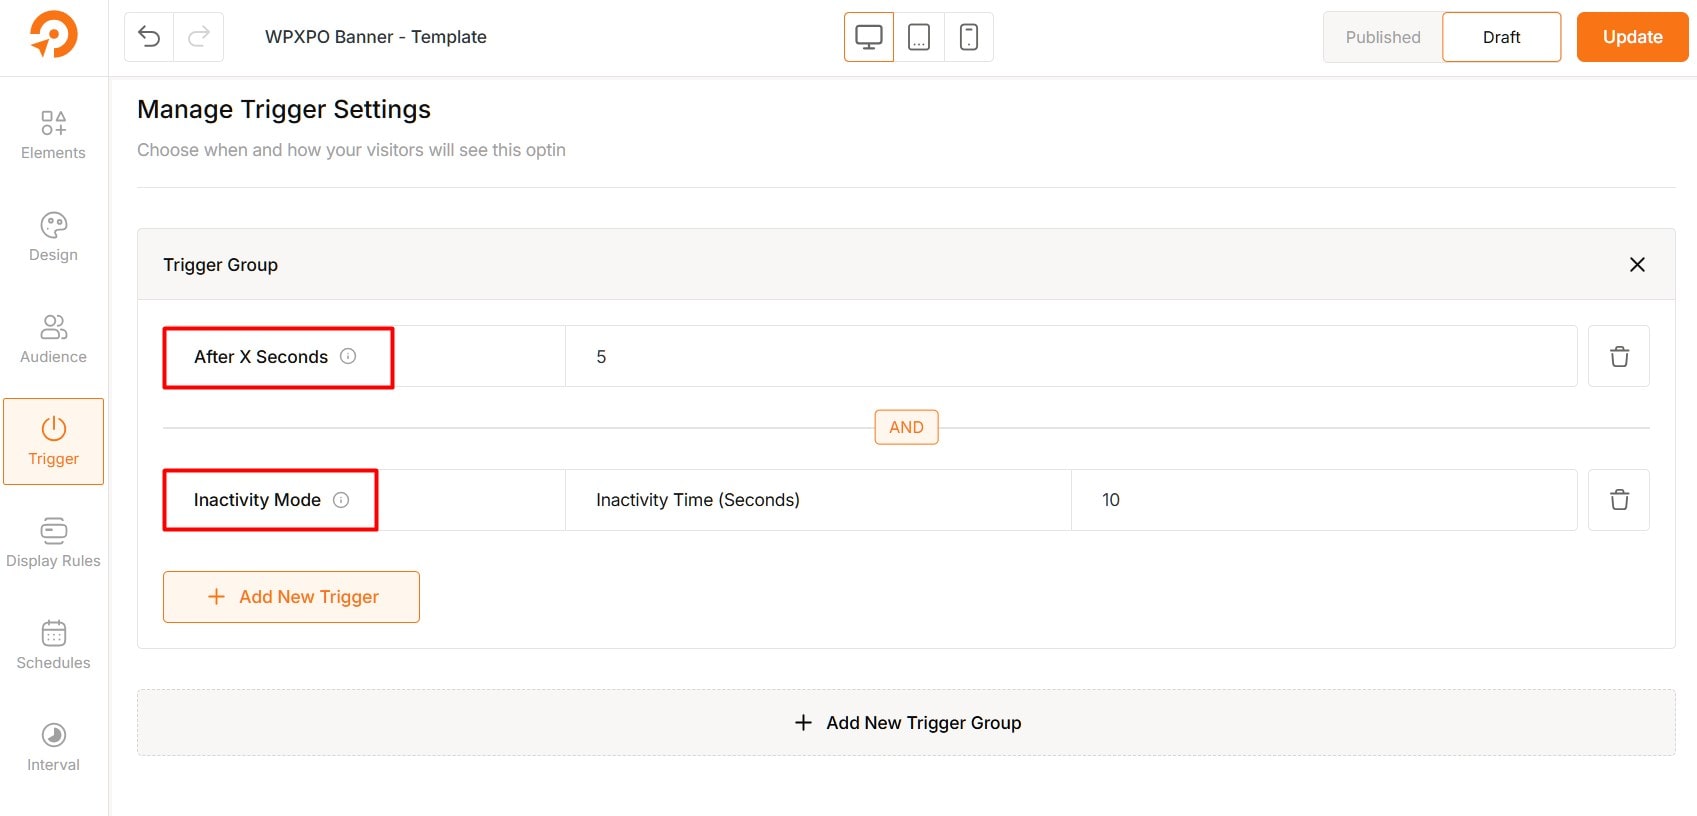
Trigger Group 1 includes: After X Seconds — The optin should appear if the visitor has been on the page for at least 20 seconds.
Trigger Group 2 includes: Inactivity Mode — The optin should appear if the visitor has been idle (not moving the mouse, scrolling, or typing) for 5 seconds.
Here’s what will happen:
- If the visitor stays on the page for 20 seconds, the condition from Trigger Group 1 is met — so the optin will appear.
- If the visitor becomes inactive for 5 seconds, even if the time-on-page condition isn’t met, the condition from Trigger Group 2 is satisfied — and the optin will also appear.
You don’t need both groups to be triggered. Just one is enough. That’s how OR logic works between the Trigger Groups.
When to Use Multiple Trigger Groups:
Use multiple trigger groups when you want the optin to show based on different alternative conditions.
- Show the popup if the user scrolls down 50% of the page,
or - Show the popup if the user clicks on any link on the page.
What Are Triggers in WowOptin?
Triggers in WowOptin are specific visitor actions or behaviors that decide when and how your popup (optin) should appear on the website.
Logic Between Triggers
When you add multiple triggers inside one group, they are connected using AND logic.
This means all triggers in the group must be satisfied together to show the optin.
Let’s break it down with an example:
Imagine you’ve added two Triggers in a Trigger Group:
After X Seconds — The optin should appear if the visitor has been on the page for at least 10 seconds.
Exit Intent — The optin should appear if the visitor attempts to leave the site.
Here’s what will happen:
- If the visitor has stayed on the page for 10 seconds and then tries to exit, the conditions are met — and the optin will appear
- But if the visitor tries to leave before reaching 10 seconds, the conditions are not fully met — so the optin will not appear
That’s how AND logic works within a Trigger Group — all triggers must happen together for the popup to show.
When to Use Multiple Triggers in One Group:
Use multiple triggers inside a single group when you want to narrow down and refine your targeting. This helps ensure that your optin appears only when specific conditions are met at the same time.
- Show the popup when the user has scrolled down 70% of the page
and then - They’ve been inactive for 10 seconds
How to Set Up Trigger Groups and Triggers
You can create as many trigger groups and triggers as needed, depending on how specific or flexible you want your targeting to be.
- To add a new Trigger Group, click the “Add New Trigger Group” button in your campaign editor.
- To add a trigger within a group, click the “Add New Trigger” button under that group.
Types of Triggers
Once you add a Trigger Group, you can choose from six powerful trigger types that respond to user actions during their visit:
1: After X Seconds
This trigger displays the optin after a specific amount of time has passed since the page loaded. To set it up:
- Choose “After X Seconds” as the trigger.
- Set the number of seconds (e.g.,
10).
The optin will appear once the visitor has been on the page for the specified duration.
Use Cases
- Show a newsletter popup 10 seconds after landing.
- Display a welcome offer after browsing starts.
- Offer a free guide after 20 seconds of reading.
- Trigger an upsell after users stay on a product page for 30+ seconds.
2: After Scrolling to X
This trigger shows the optin based on how far down the page the user scrolls. You can configure it as follows:
- Select “After Scrolling” as the trigger.
- Choose either Pixels or Percentage, then enter a value (e.g.,
300pxor40%).
(Optional) Set a delay before it appears.
Use Cases:
- Show a discount after scrolling halfway down a product page.
- Display a lead magnet below a blog’s intro section.
- Engage long readers with a CTA after deep scroll.
- Offer an upsell after viewing 70% of a feature page.

3: Inactivity Mode
This trigger detects user inactivity (no movement or interaction) and displays the optin after a set period. Here’s how to enable it:
- Choose “Inactivity Mode” from the trigger list.
- Enter the inactivity time in seconds (e.g.,
60).
The optin will appear after the visitor has been inactive for the specified time.
Use Cases:
- Show a “Need Help?” form after 1 minute of inactivity.
- Display a live chat or support link after user pauses.
- Re-engage distracted shoppers on checkout or cart pages.
- Offer a time-sensitive discount when a user stops interacting.
4: Exit Intent
This trigger activates when the visitor is about to leave the page. Here’s how to configure it:
- Select “Exit Intent” from the trigger options.
- Choose a Sensitivity level: Low, Medium, or High.
Your optin will be triggered as the user shows intent to leave.
Use Cases:
- Offer a last-minute coupon to reduce bounce.
- Show a freebie in exchange for email before exit.
- Remind users of abandoned items in their cart.
- Trigger an exit survey before the user leaves.
Select Sensitivity
There are three options to control the sensitivity of the exit-intent trigger.
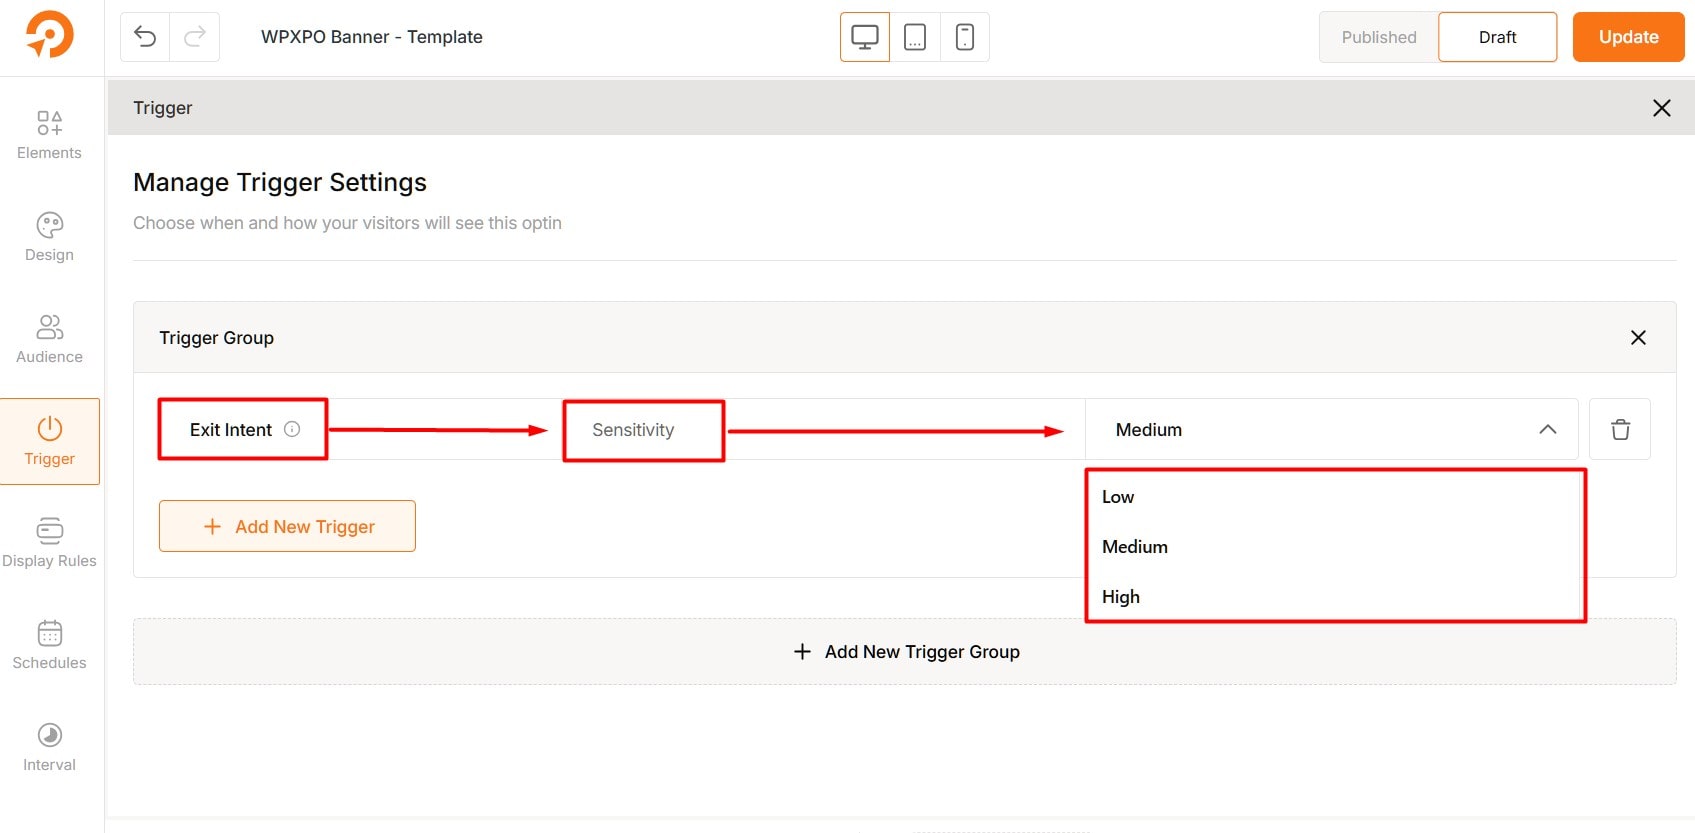
Low Sensitivity: The popup triggers when the cursor is near the browser’s back or close button.
Medium Sensitivity: The popup appears when the cursor moves toward the back or close button. But it has yet to reach there.
High Sensitivity: The popup appears as soon as the cursor starts moving toward the back or close button.
Each level controls how quickly the popup is triggered based on the cursor’s movement.
Best Practice: Exit intent is ideal for offering incentives (e.g., discounts, free resources) to encourage users to stay or convert before leaving.
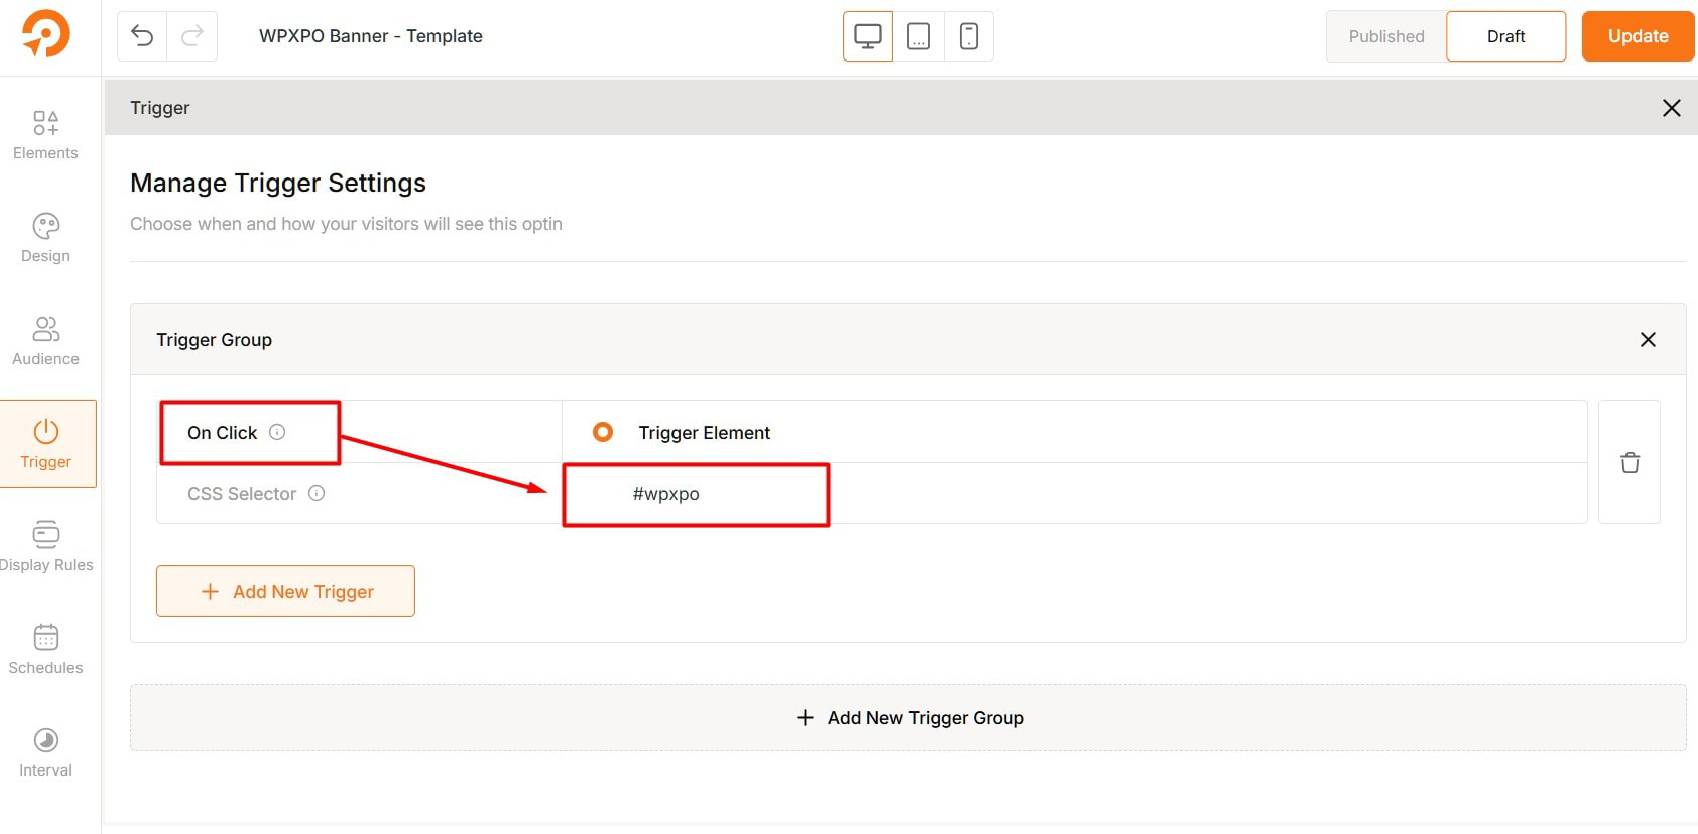
5: On Click
This trigger shows the optin when a specific clickable element is interacted with. Here’s how to set it:
- Choose “On Click” as the trigger.
- Enter the CSS selector of the clickable element (e.g.,
.start-nowor#demo-button).
The optin will show instantly when that element is clicked.
Use Cases:
- Trigger a signup form from a “Get Started” button.
- Open a special offer when “See Plans” is clicked.
- Launch a gated content popup from a link click.
- Show download form after clicking “Get My Guide”.
6: On Hover
This trigger shows the optin when a user hovers over a defined element for a set duration. To set it up:
- Select “On Hover” as the trigger.
- Enter the element’s CSS selector (e.g.,
.hover-boxor#pricing-hover), then set the Minimum Hover Duration in seconds.
The optin appears after the hover duration is met.
Use Cases:
- Reveal a discount when users hover over a pricing table.
- Show a feature preview when hovering on product images.
- Trigger a trial signup when hovering on CTA buttons.
- Display educational tooltips or quick offers on hover spots.
Best Practices for Triggers Settings
- Use Targeted Timings: Set delays and inactivity triggers to appear when users are most likely to engage.
- Avoid Overlapping Triggers: Too many overlapping triggers can create a disruptive experience. Use distinct groups to diversify engagement points.
- Experiment with Different Groups: Test different trigger groups to find the most effective combination for conversions and engagement.